Efflux — User manual
Efflux is the companion app for Thearen flux chambers. It connects to a non-stationary accumulation-chamber instrument, shows gas concentrations building up in real time, turns them into a soil gas flux, and keeps every measurement in a searchable archive you can map, review and export.
This manual covers the app as it ships on Android, Windows, Linux and the browser. It assumes you have a Thearen IRB flux chamber to hand; without an instrument the app will start, but only the Campaigns, Archive and Settings screens have anything to show.
In a hurry? Read Before you start, Connecting an instrument and Recording an acquisition. That is the whole field workflow.
Before you start #
What you need #
- Required — a Thearen IRB flux chamber, powered on and within range.
- Required for flux acquisitions — an accumulation chamber, paired over Bluetooth.
- Optional — a GPS receiver (Garmin eTrex or GLO 2), for higher-accuracy geotagging than the phone’s own GPS.
The instrument connects in one of two ways:
- Bluetooth Low Energy (BLE) — the usual choice in the field. Available on Android only.
- WiFi / network — the instrument exposes a WebSocket on TCP port 8083 and announces itself on the local network via mDNS. Available on every platform.
What runs where #
Bluetooth and mDNS discovery are native features, so they are not available in a browser tab or in the desktop build. This is the single most important difference between the platforms:
| Android | Windows / Linux desktop | Web browser | |
|---|---|---|---|
| Bluetooth instruments | Yes | No | No |
| Bluetooth peripherals (chamber, GPS) | Yes | No | No |
| Network (WiFi) instruments | Yes | Yes | Yes¹ |
| Campaigns, Archive, review, export | Yes | Yes | Yes |
| Automatic app updates | Play Store | Built in | Reload the page |
¹ A page served over HTTPS cannot open a plain ws:// connection to an instrument on your local
network. If you use the hosted web app, install the Efflux Helper — a small local bridge, at
efflux.witrec.it/helper — and Efflux will route through it
automatically. The Network tab tells you when the helper is needed.
iOS and macOS builds are not published yet.
Installing #
Everything is on the download page at efflux.witrec.it.
- Android — install from Google Play (recommended), or sideload the
.apk. This is the full field build: Bluetooth, GPS and network all work. - Windows — run the
.exeinstaller. It is unsigned, so SmartScreen warns on first run; choose More info → Run anyway. Network instruments only. - Linux — the portable
.AppImageruns on any distribution; there are also.deband.rpmpackages. Network instruments only. - Web — open efflux.witrec.it/app. Nothing to install; your data stays in that browser on that computer.
The desktop build updates itself: when a newer version is published it offers Update now in a banner, downloads it and restarts. You can also check on demand from Settings → Software updates.
Where your data lives #
Efflux stores acquisitions and campaigns on the device, in a local database. There is no account and nothing is uploaded anywhere. That has two consequences worth knowing before a campaign:
- Data does not follow you between devices by itself. Move it with an export/import (see Backing up and moving data).
- On the web build, clearing the browser’s site data deletes your acquisitions.
Fixed (autonomous) instruments are the exception — they own their own data and upload it through their configured telemetry backend, not through the app.
Getting around #
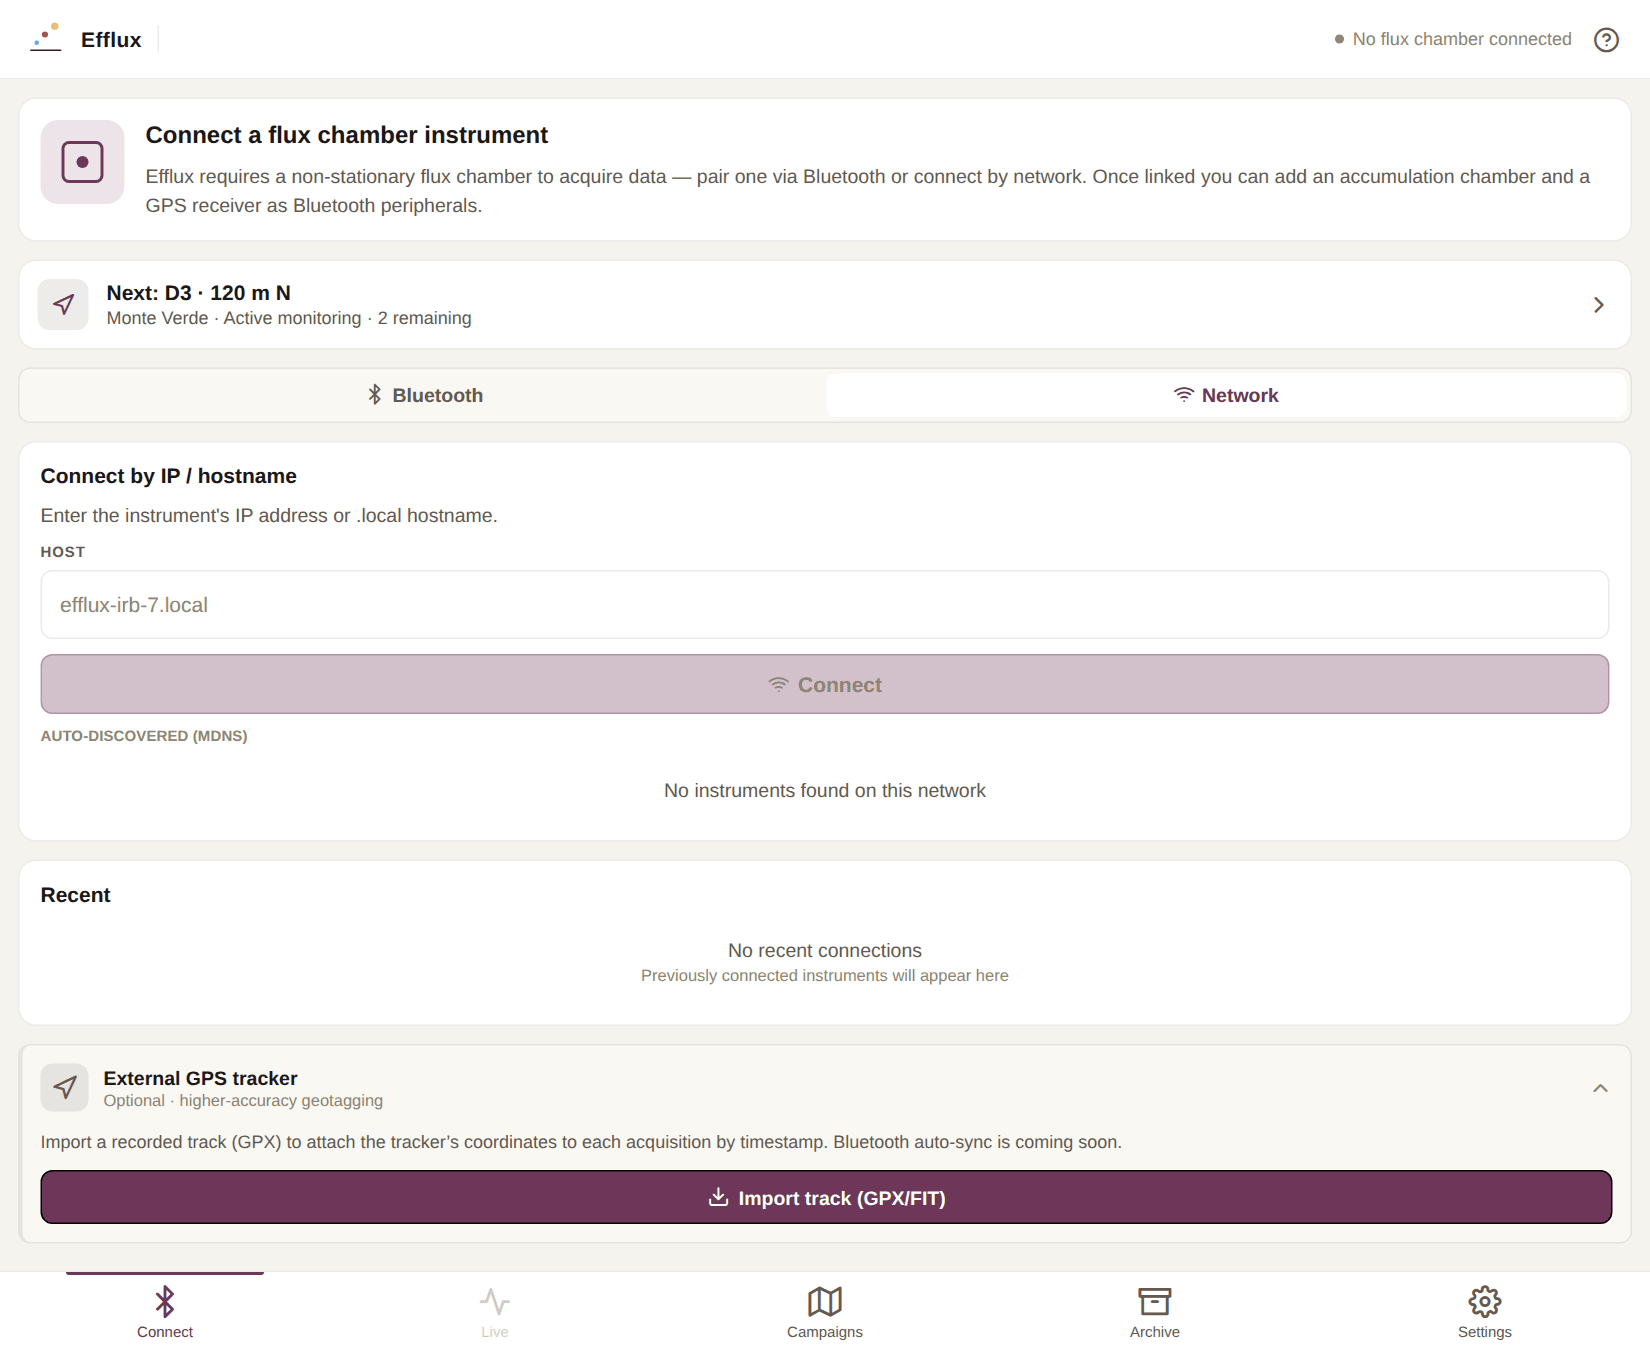
Every screen shares the same frame:
- The top bar carries the Efflux mark, the connection status on the right (Linked plus the instrument name, or No flux chamber connected), and a ? button that replays the guided walkthrough for the current screen.
- The navigation bar along the bottom has five destinations: Connect (which becomes Device once an instrument is linked), Live, Campaigns, Archive and Settings. Live is greyed out until an instrument is connected — or while an unsaved acquisition is waiting to be saved.
Guided walkthroughs #
The first time you open a screen, Efflux highlights its key controls one step at a time. Use Next / Back to step through, or Skip to dismiss it; each screen’s tour is shown once. Press ? in the top bar to replay the current screen’s tour at any time, or reset all of them from Settings → General → Reset walkthroughs.
Language and appearance #
Efflux follows your device language and light/dark setting on first launch. Both can be overridden in Settings → General. The manual’s screenshots use the light theme.
Connecting an instrument #
Open Connect. Choose the Bluetooth or Network tab, depending on how the instrument is reachable.
Over Bluetooth #
Press Scan. Nearby flux chambers appear under Nearby flux chambers; tap one to connect.
If the list stays empty, check that the IRB is powered on and within range, and that Bluetooth and location permissions are granted to Efflux. On the web and desktop builds the tab reports Bluetooth is unavailable — that is expected, use Network instead.
Over the network #
There are two ways in:
- Connect by IP / hostname — type the instrument’s address (for example
efflux-irb-7.local) and press Connect. - Auto-discovered (mDNS) — instruments that announce themselves on the local network are listed automatically; tap one. mDNS discovery is Android-only; on desktop and web, enter the address.
Recent connections #
Instruments you have connected to before are listed under Recent, so you can reconnect with one tap without scanning.
If the connection drops #
If the link to the instrument or to the accumulation chamber is lost unexpectedly, Efflux shows a Connection lost overlay and reconnects on its own — you do not need to do anything. An acquisition in progress survives the gap. Press Give up to stop retrying and return to Connect.
Pairing peripherals #
Peripherals are paired from the Device screen once the instrument is linked, under Peripherals.
Accumulation chamber — required for flux acquisitions. Press Scan for chambers and pick yours. Its pressure, temperature and humidity readings then appear on the card and are used in the flux calculation.
The two GPS cards below it — External GPS tracker and Live GPS — have a chapter of their own: see GPS trackers and geotagging.
The Device screen #
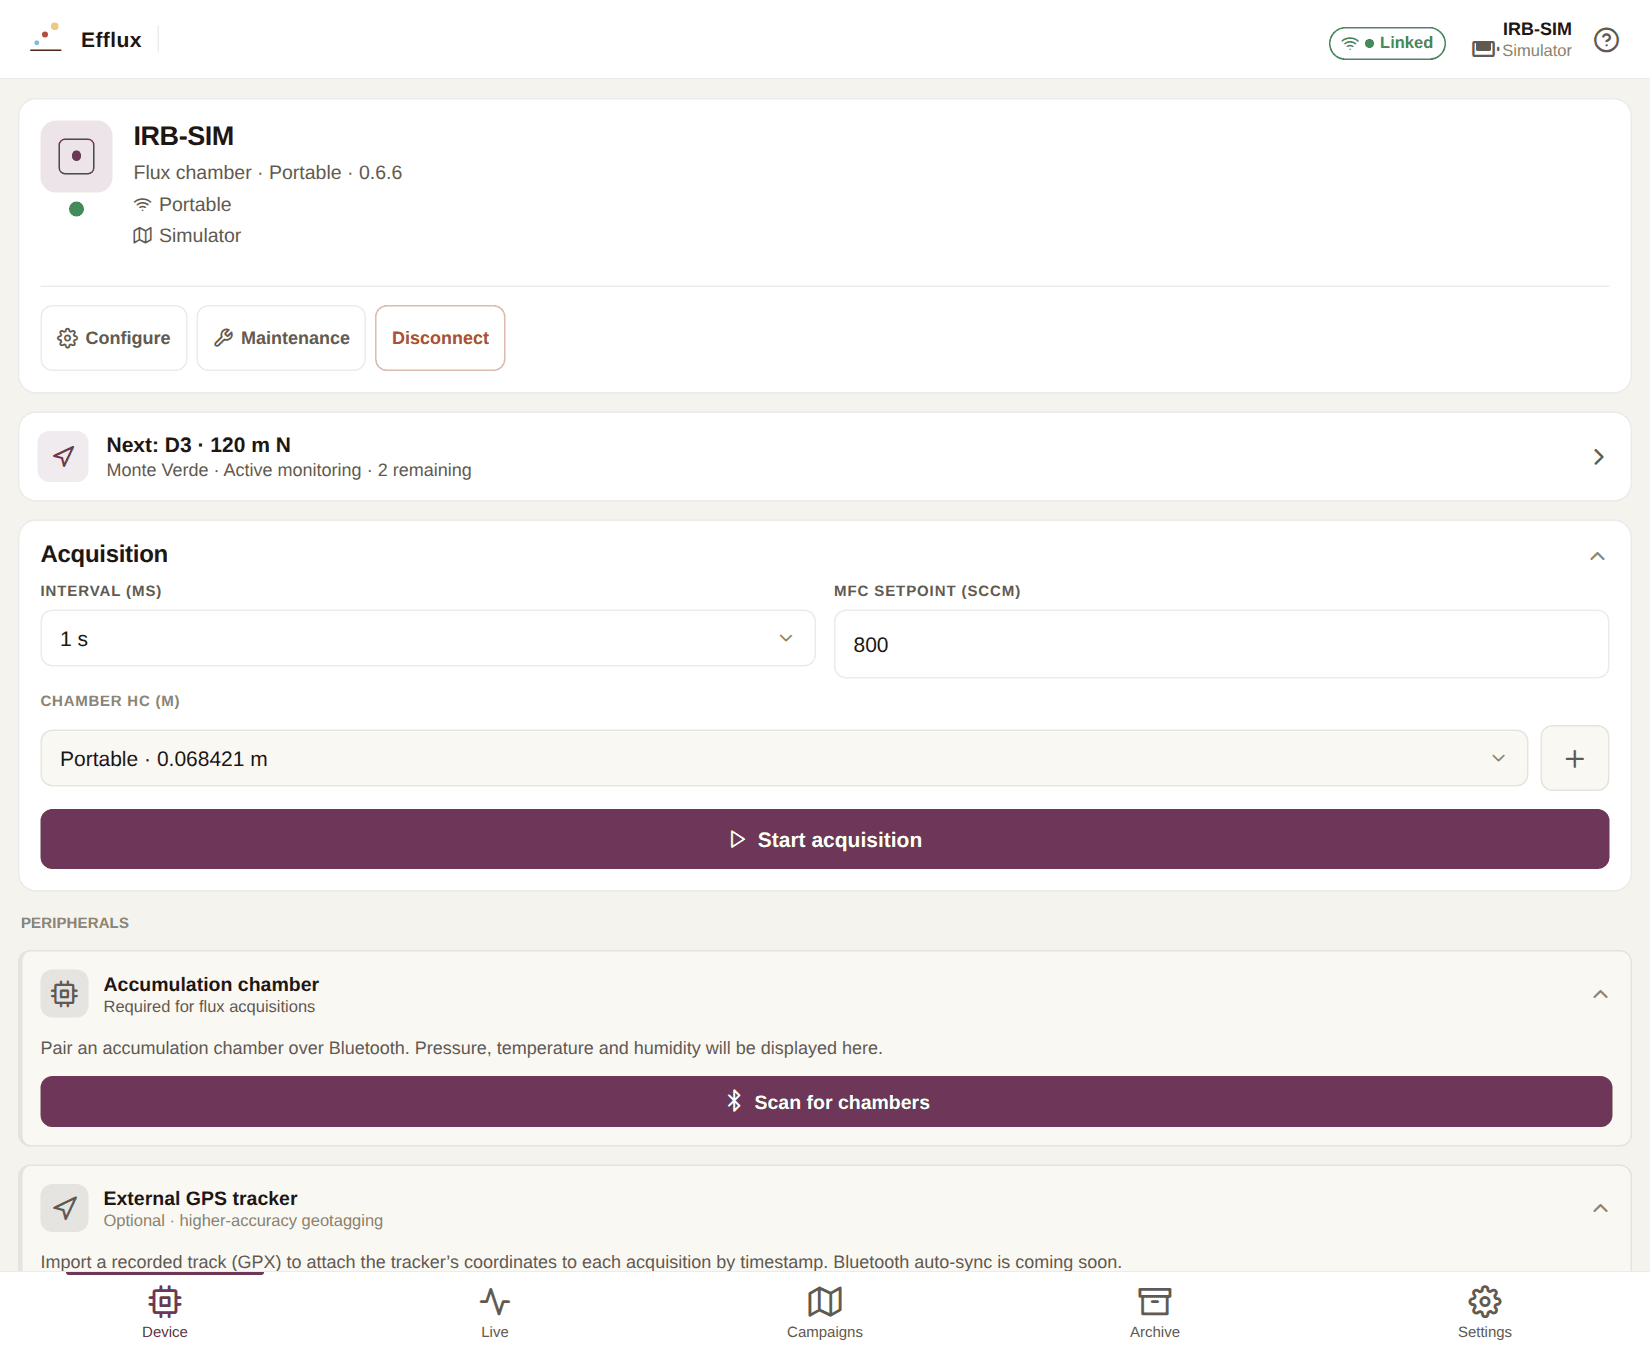
This is the instrument’s home page. The card at the top shows its name, model, operating mode, firmware version, signal and battery, with three actions: Configure, Maintenance and Disconnect.
Operating mode #
Every instrument reports one of two modes, and it changes what the rest of the app offers:
- Portable — you drive each measurement by hand. This is the mode campaigns are built for.
- Fixed — the instrument runs autonomous acquisition cycles on its own schedule. Efflux shows the current cycle state and a countdown to the next one, and can trigger one early with Start cycle now, but it never stops or saves a cycle: the firmware owns that data.
Sensors #
The Sensors card lists each sensor with its current reading and status. Sensors start paused to save power. Press Power on sensors and the instrument moves through Warming up (about 15 seconds) to Acquiring, at which point the values go live. Individual sensors can report Error or Off, which always overrides the global state.
Sensors are one of two kinds, and the difference decides which statistics you get later:
- Gas — CO₂ (Licor, GSS, Vaisala), CH₄, H₂O, H₂S, SO₂. All gas streams get a slope and R²; flux is computed for CO₂ and CH₄.
- Environmental — pressure, temperature, humidity. These get min / max / mean; flux does not apply.
Acquisition parameters #
The Acquisition card holds the settings used for the next measurement:
| Setting | Default | What it does |
|---|---|---|
| Interval (ms) | 1 s | How often the instrument samples. Choose 0.5 s – 3 s. |
| MFC setpoint (sccm) | 800 | Target flow through the mass-flow controller. |
| Chamber Hc (m) | 0.068421 | The chamber’s effective height, used in the flux calculation. Pick a preset (Portable / Fixed) or add your own with +. |
| GSS digital filter | 64 | Smoothing applied to the GSS CO₂ sensor. |
| Set GSS zero | On | Re-zero the GSS sensor before acquiring. |
| GSS zero offset (ppm) | 417 | The value to fall back on when zeroing. |
The three GSS settings only appear when the instrument actually has a GSS CO₂ sensor and firmware 0.6.36 or newer; Set GSS zero additionally requires that no other CO₂ sensor is fitted.
Chamber Hc is used by the app, not sent to the instrument. It is stored with each acquisition, so getting it right matters for the flux figures — but you can correct it later by re-running the calculation on the saved record.
Recording an acquisition #
The measurement cycle #
A full measurement is a sequence the instrument steps through: warm up → close the chamber → acquire → open the chamber → clean the pneumatic circuit. Efflux drives it for you and keeps the screen awake throughout.
Running it #
- On Device, check the acquisition parameters — especially Chamber Hc.
- Press Start acquisition. Efflux switches to the Live screen and the cycle begins.
- Watch the curve build. Press Stop when you have enough of a trend.
- Press Save and tag the run.
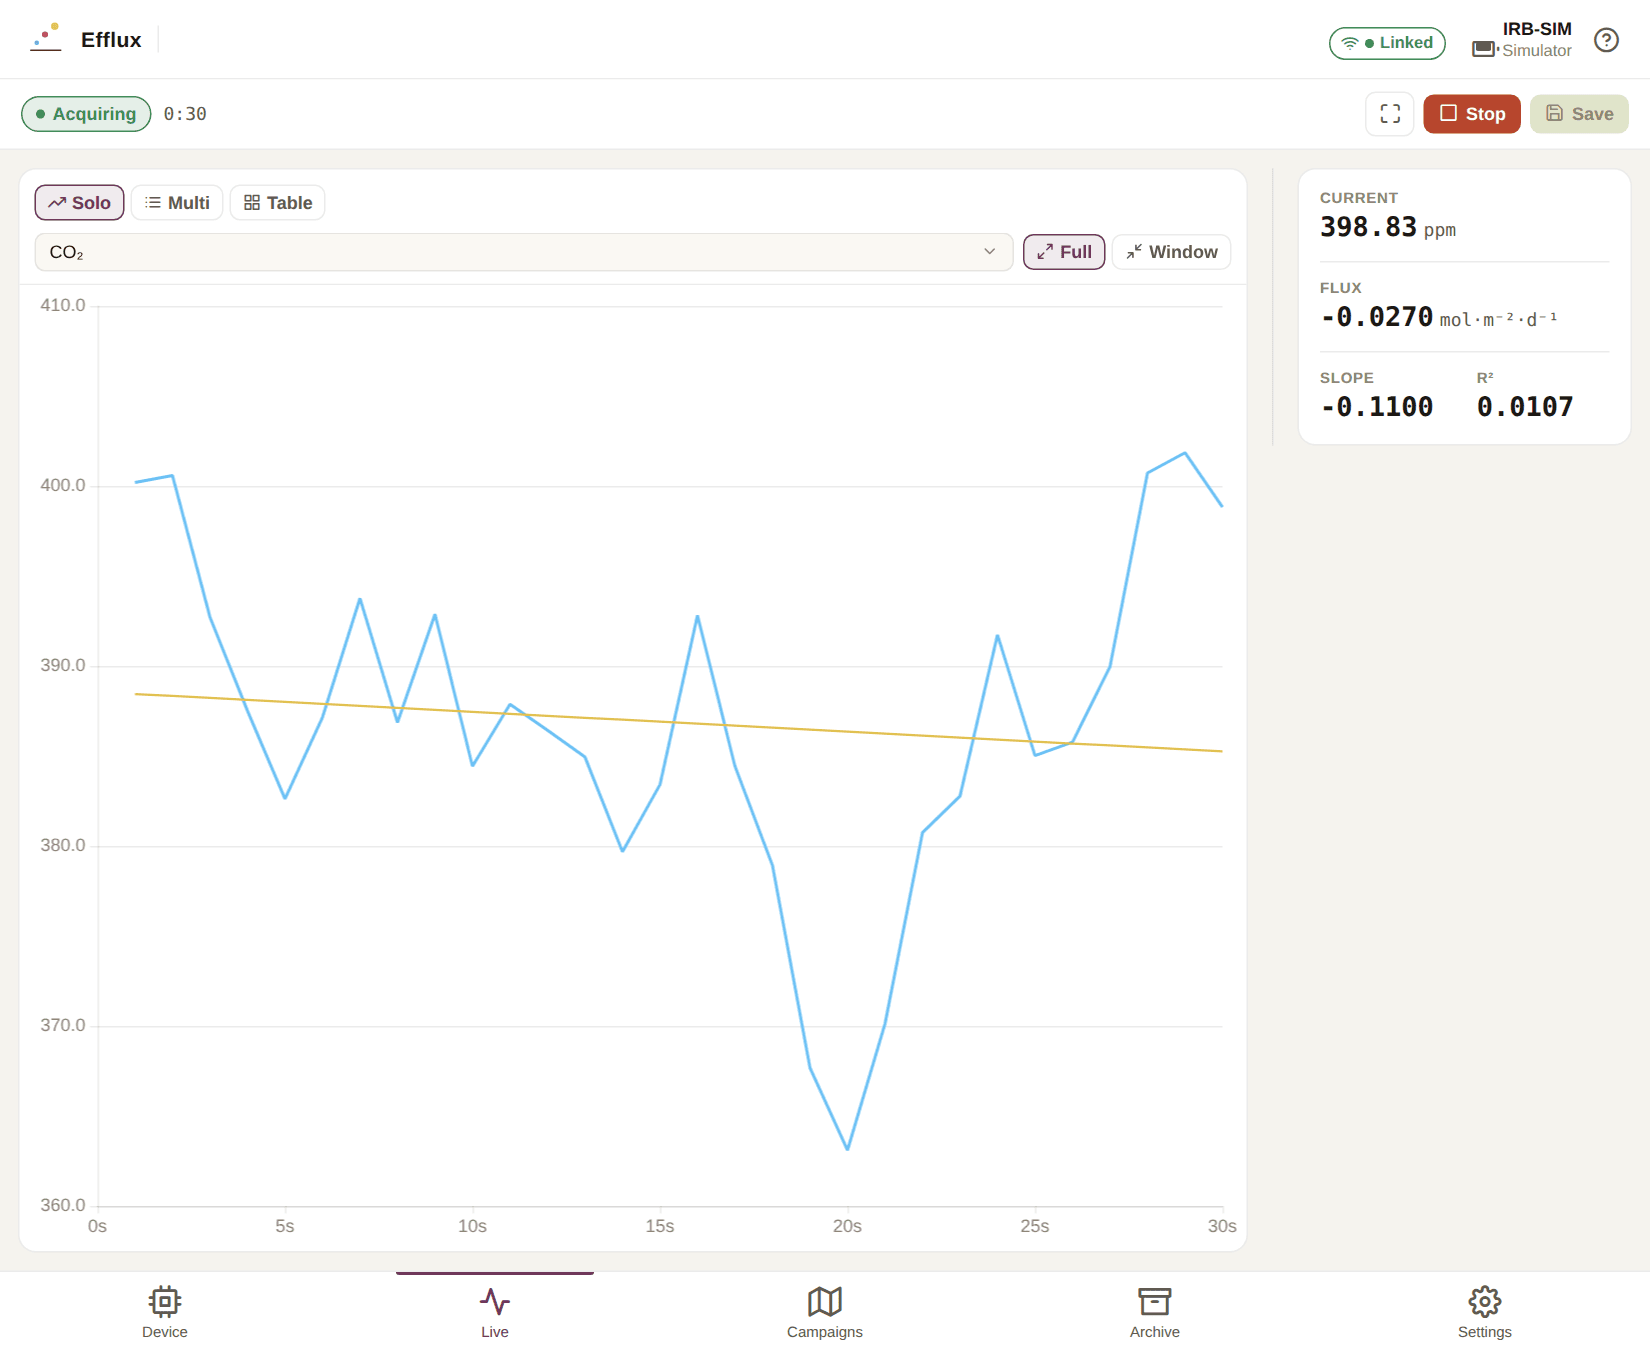
Reading the Live screen #
The header shows the state (Acquiring) and elapsed time, with Stop and Save, plus a button that expands the chart to full screen.
Three ways to view the data:
- Solo — one stream at a time, chosen from the dropdown. The straight line across the curve is the fitted regression the flux is derived from.
- Multi — several streams together. Gases, All and Clear select groups quickly.
- Table — the raw numbers.
Full shows the whole acquisition; Window zooms to the recent portion, with Reset to go back.
The statistics panel shows, for the selected stream:
| Statistic | What it tells you |
|---|---|
| Current | The latest reading, in the sensor’s own unit. |
| Flux | The soil gas flux — the number the measurement exists to produce. Gas streams only (CO₂ and CH₄). |
| Slope | Rate of change of concentration, the basis of the flux. |
| R² | How well the straight line fits. Close to 1 means a clean, linear accumulation; a low R² is a warning that the run is noisy or the chamber is not sealing. |
| Min / Max / Mean / Std dev | For environmental streams. |
Two warnings can appear next to the state badge: Low flow, when the measured flow sits well below the MFC setpoint, and LICOR warming up, while that sensor stabilises.
On a fixed instrument the Live screen is monitor-only: the chart and statistics stay live, but Start, Stop and Save are replaced by a Monitoring badge.
Saving the run #
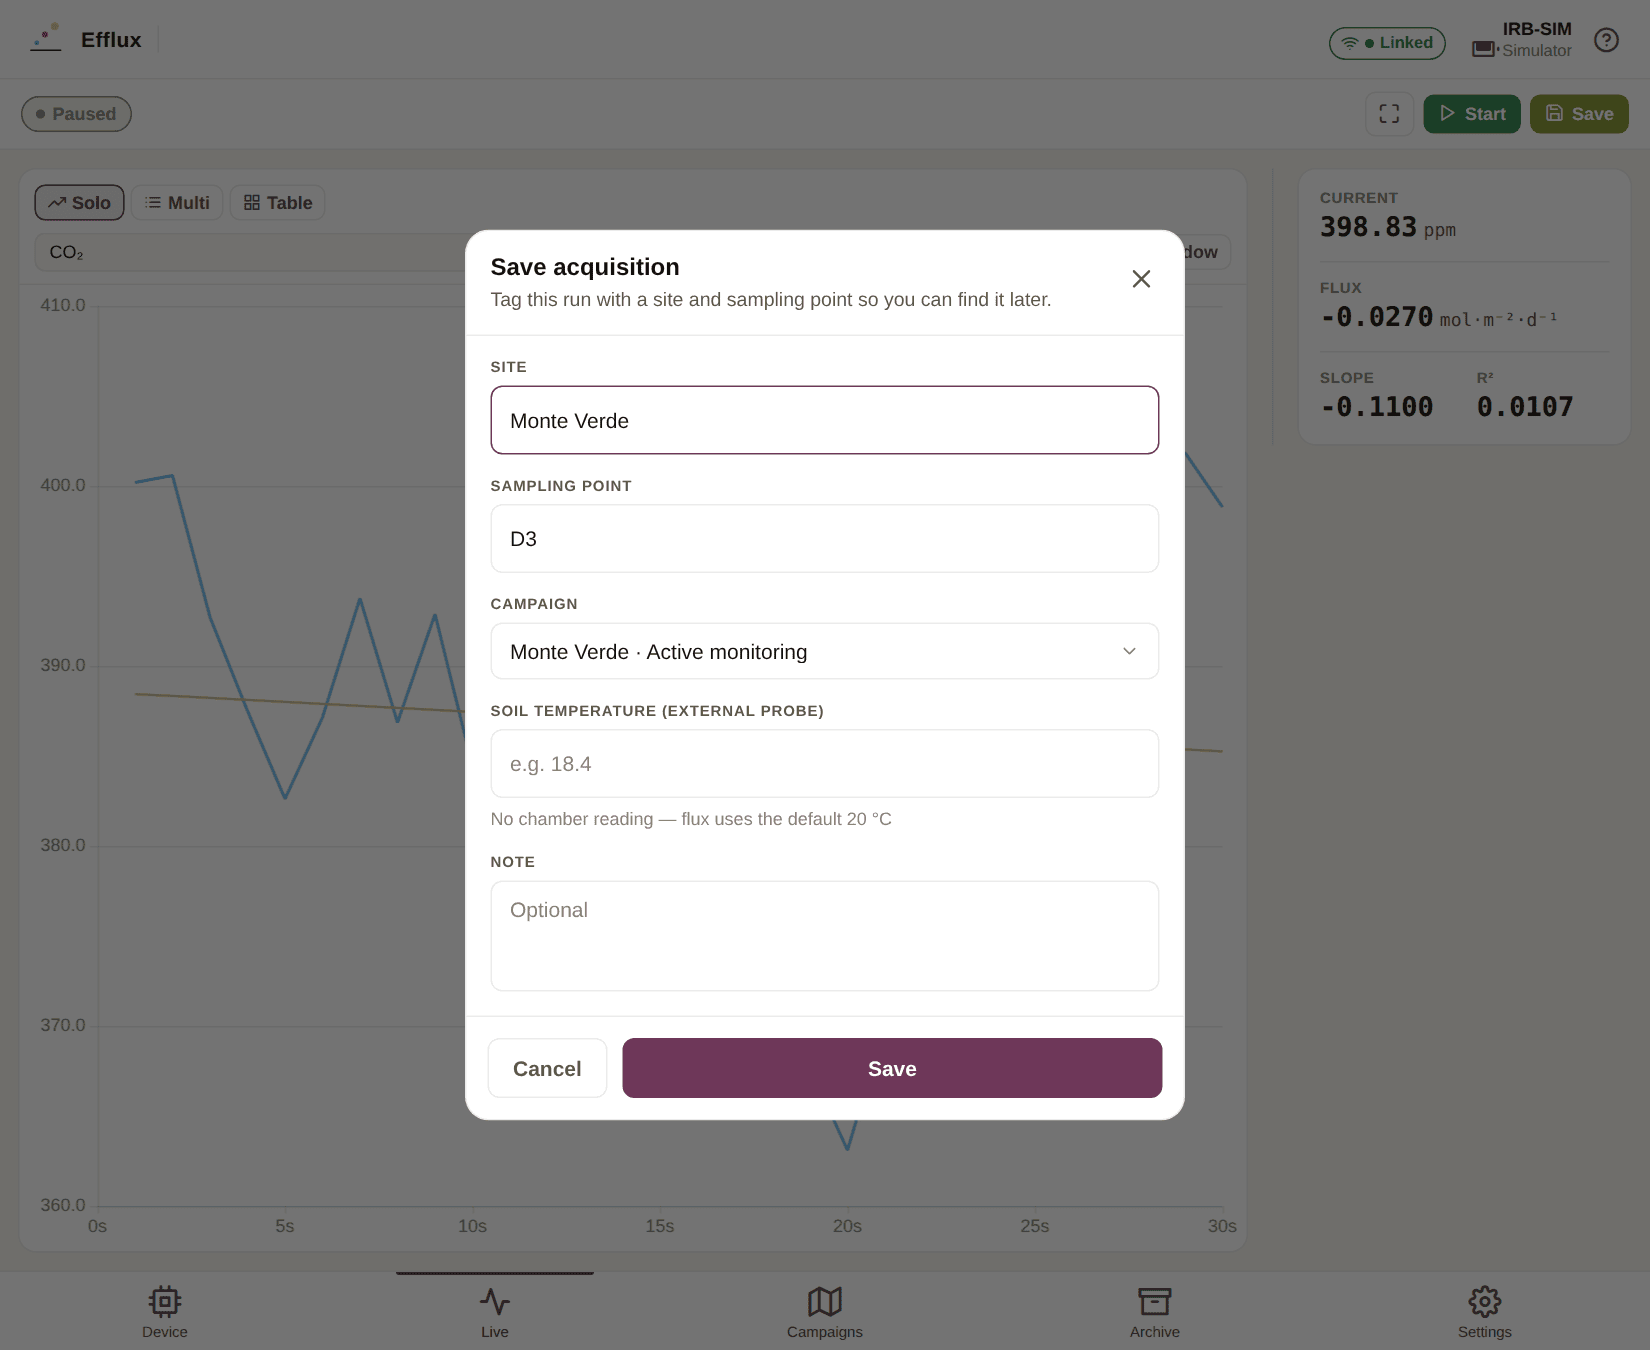
Save opens a sheet with:
- Site and Sampling point — how you will find this run later. If a campaign is active, the sampling point is pre-filled with the next un-sampled point in its plan.
- Campaign — defaults to the active campaign; set it to None to leave the run unassigned.
- Soil temperature (external probe) — optional. If you measured soil temperature with a separate probe, enter it here and the flux is recalculated with it. Without it, Efflux uses the chamber’s own reading, or 20 °C if there is none.
- Note — anything you want to remember about the run.
- Position — the coordinates being recorded, from the phone GPS or your external receiver.
Press Save. If you start a new acquisition while one is still unsaved, Efflux warns you first — continuing discards it.
GPS trackers and geotagging #
Every acquisition is saved with the coordinates where it was taken. That is what puts a measurement on a campaign’s flux map, what fills the easting/northing in an export, and what lets you come back to the same spot next season. This chapter covers where that position comes from and how to improve it.
Where the position comes from #
Efflux always runs the device’s own GPS as a baseline. If you have connected an external receiver, it is preferred instead — but only while its fix is fresh: if more than five seconds pass without a new one, Efflux quietly falls back to the device position and switches back as soon as the receiver recovers.
This matters in practice. A receiver that loses satellites halfway through a measurement, or a Bluetooth link that drops and comes back, needs no intervention and does not spoil the run — the acquisition keeps recording a position throughout.
The coordinates are shown as Position in the save sheet, and stored with the record. Whether they are displayed as WGS 84 or UTM is set in Settings → Units → Coordinate format; that is a display choice, so you can change it later without touching the data.
Choosing a receiver #
| Position quality | When you get it | Effort | |
|---|---|---|---|
| Device GPS | Whatever the phone, tablet or computer manages | Live, always on | None — it is the baseline |
| Garmin GLO 2 | Better: a dedicated GPS + GLONASS receiver | Live, during the acquisition | Pair once, connect each session |
| Garmin eTrex SE | Best, and it also records where you walked | After the fact, applied to saved records | Pair once, then download and apply |
The two are not exclusive. A common arrangement is to use the GLO 2 for live positions while you work and the eTrex track as a higher-accuracy correction afterwards.
What works on which platform #
Both receivers connect over Bluetooth, so — as with the instrument itself — the browser build is limited:
| Android | iOS | Linux desktop | Windows desktop | Web browser | |
|---|---|---|---|---|---|
| Device / browser position | Yes | Yes | Yes | Yes | Yes |
| GLO 2 live position | Yes | Through iOS Settings | Yes | Not yet | No |
| eTrex track download | Yes | Yes | Yes | Yes | No |
| eTrex track import from a file | Yes | Yes | Yes | Yes | Yes |
| Send a campaign plan to the eTrex | Yes | Yes | Yes | Yes | No |
The desktop Bluetooth paths are newer and less exercised than the Android ones; on Windows the
GLO 2 is not supported yet. Importing a .gpx or .fit track works everywhere, including in the
browser, and is the fallback wherever Bluetooth is unavailable.
Garmin GLO 2 — a live position #
The GLO 2 is a pocket GPS + GLONASS receiver that streams its position continuously over Bluetooth. Connect it and every acquisition you record is tagged with its fix instead of the device’s.
Its card is Live GPS (Garmin GLO 2), on the Device screen.
- Switch the GLO 2 on and press Find GLO.
- Tap it in the list to pair — it needs no PIN, and the pairing happens inside Efflux; there is no trip to the system Bluetooth settings.
- Press Connect. Until the receiver has locked on you will see Waiting for a satellite fix…; after that the card shows the live latitude, longitude and altitude.
The connection is managed from the Device screen rather than tied to an acquisition, so the receiver stays warm between measurements. Disconnect drops the link for this session; Forget also clears the saved receiver, so the next connection starts from a fresh search. (It leaves the Bluetooth pairing in place, which is harmless and saves pairing again.)
On iOS there is nothing to set up in Efflux. The GLO 2 is an Apple MFi accessory: pair it in Settings → Bluetooth and iOS feeds its position into Location Services, so the app picks it up automatically. The card just says so.
Garmin eTrex SE — a recorded track, applied afterwards #
The eTrex works the other way round. It records a track while you go about the survey, and you attach that track to your acquisitions afterwards, matching them up by time. Because it is applied after the fact, it improves acquisitions you have already saved — including ones recorded before you thought about accuracy.
Its card is External GPS tracker, on both the Connect and the Device screen. Having it on Connect is deliberate: you can pair the receiver and push a campaign plan to it in the lab, before the instrument is switched on.
Pairing. Press Connect eTrex over BLE. On Android a pairing request appears — type the passkey shown on the eTrex screen. Once paired the eTrex stops advertising itself, so from then on use Reconnect rather than searching again. Forget unpairs it properly, and the next connection prompts for the passkey again.
Downloading. Press Download. The first sync pulls the whole track catalogue, which takes a little longer; later ones fetch only what has been recorded since and merge it into what you already have. Efflux reports how many points it loaded. Leave the eTrex recording and nearby while this runs.
Applying. Press Apply track to acquisitions. Efflux matches each saved acquisition to the track by timestamp and updates its coordinates, then tells you the result — for example Updated 12 · 3 outside track, meaning three acquisitions fell outside the period the track covers and were left alone.
Importing instead. Import track (GPX/FIT) takes a track file you already have, from the eTrex or anything else, and then applies it in exactly the same way. This is how you use a recorded track on the desktop or web builds, where the Bluetooth download is unavailable.
Clear track discards the loaded track without touching any acquisition.
Sending a campaign plan to the eTrex #
Once an eTrex is paired, a campaign’s detail screen gains a Send plan to eTrex button. It uploads the campaign’s planned sampling points to the receiver as waypoints, in a collection named after the campaign — so you can navigate to them on the eTrex itself, with its own antenna and button interface, instead of walking with your phone out.
The upload is paced by the receiver, roughly half a second per waypoint: a sixteen-point plan takes something like fifteen to twenty seconds. Efflux reports how many waypoints were accepted, and says so plainly if the eTrex took only some of them.
Free-form campaigns have no planned points, so the button does not appear for them.
Campaigns #
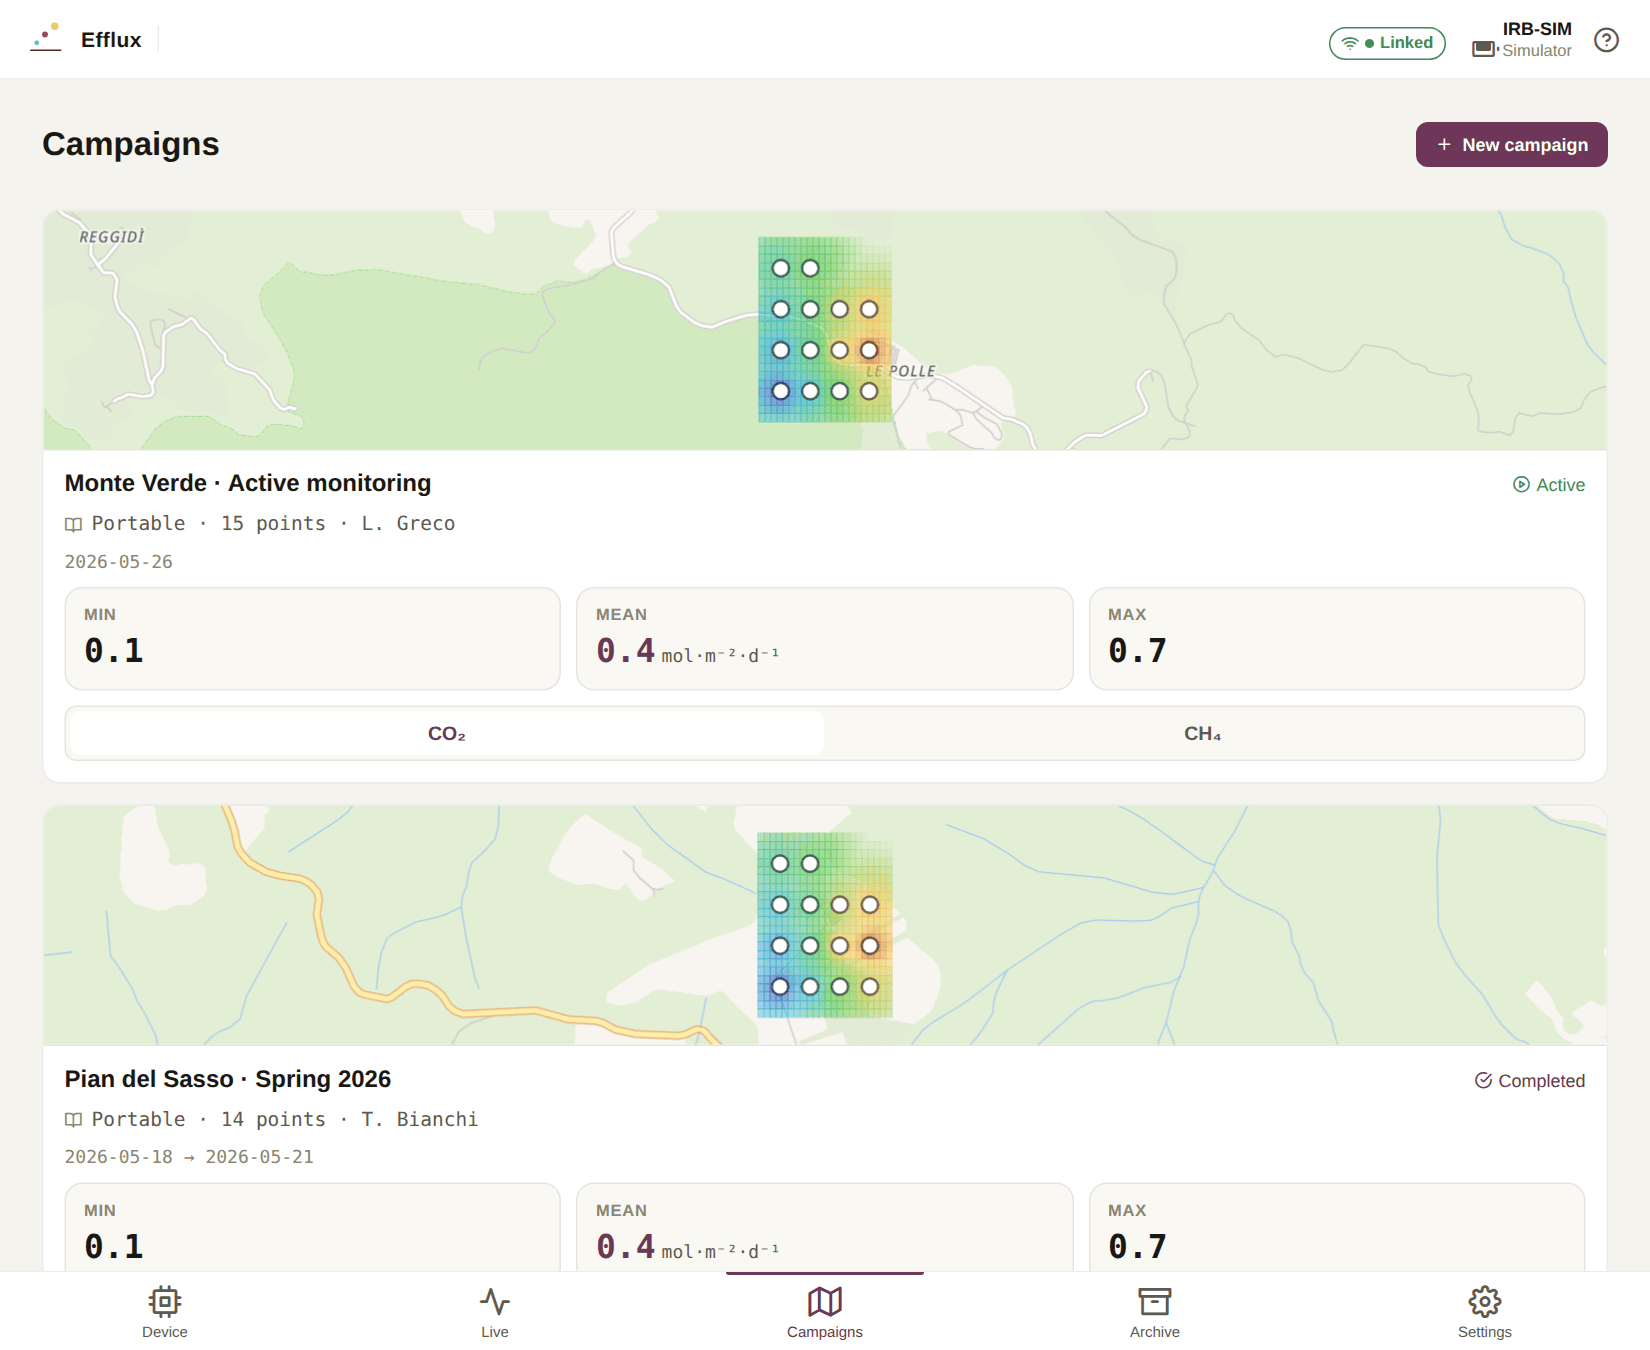
A campaign is a portable-mode survey: a plan of sampling points, plus the acquisitions you actually record against it, drawn as an interpolated flux surface on a map.
Creating one #
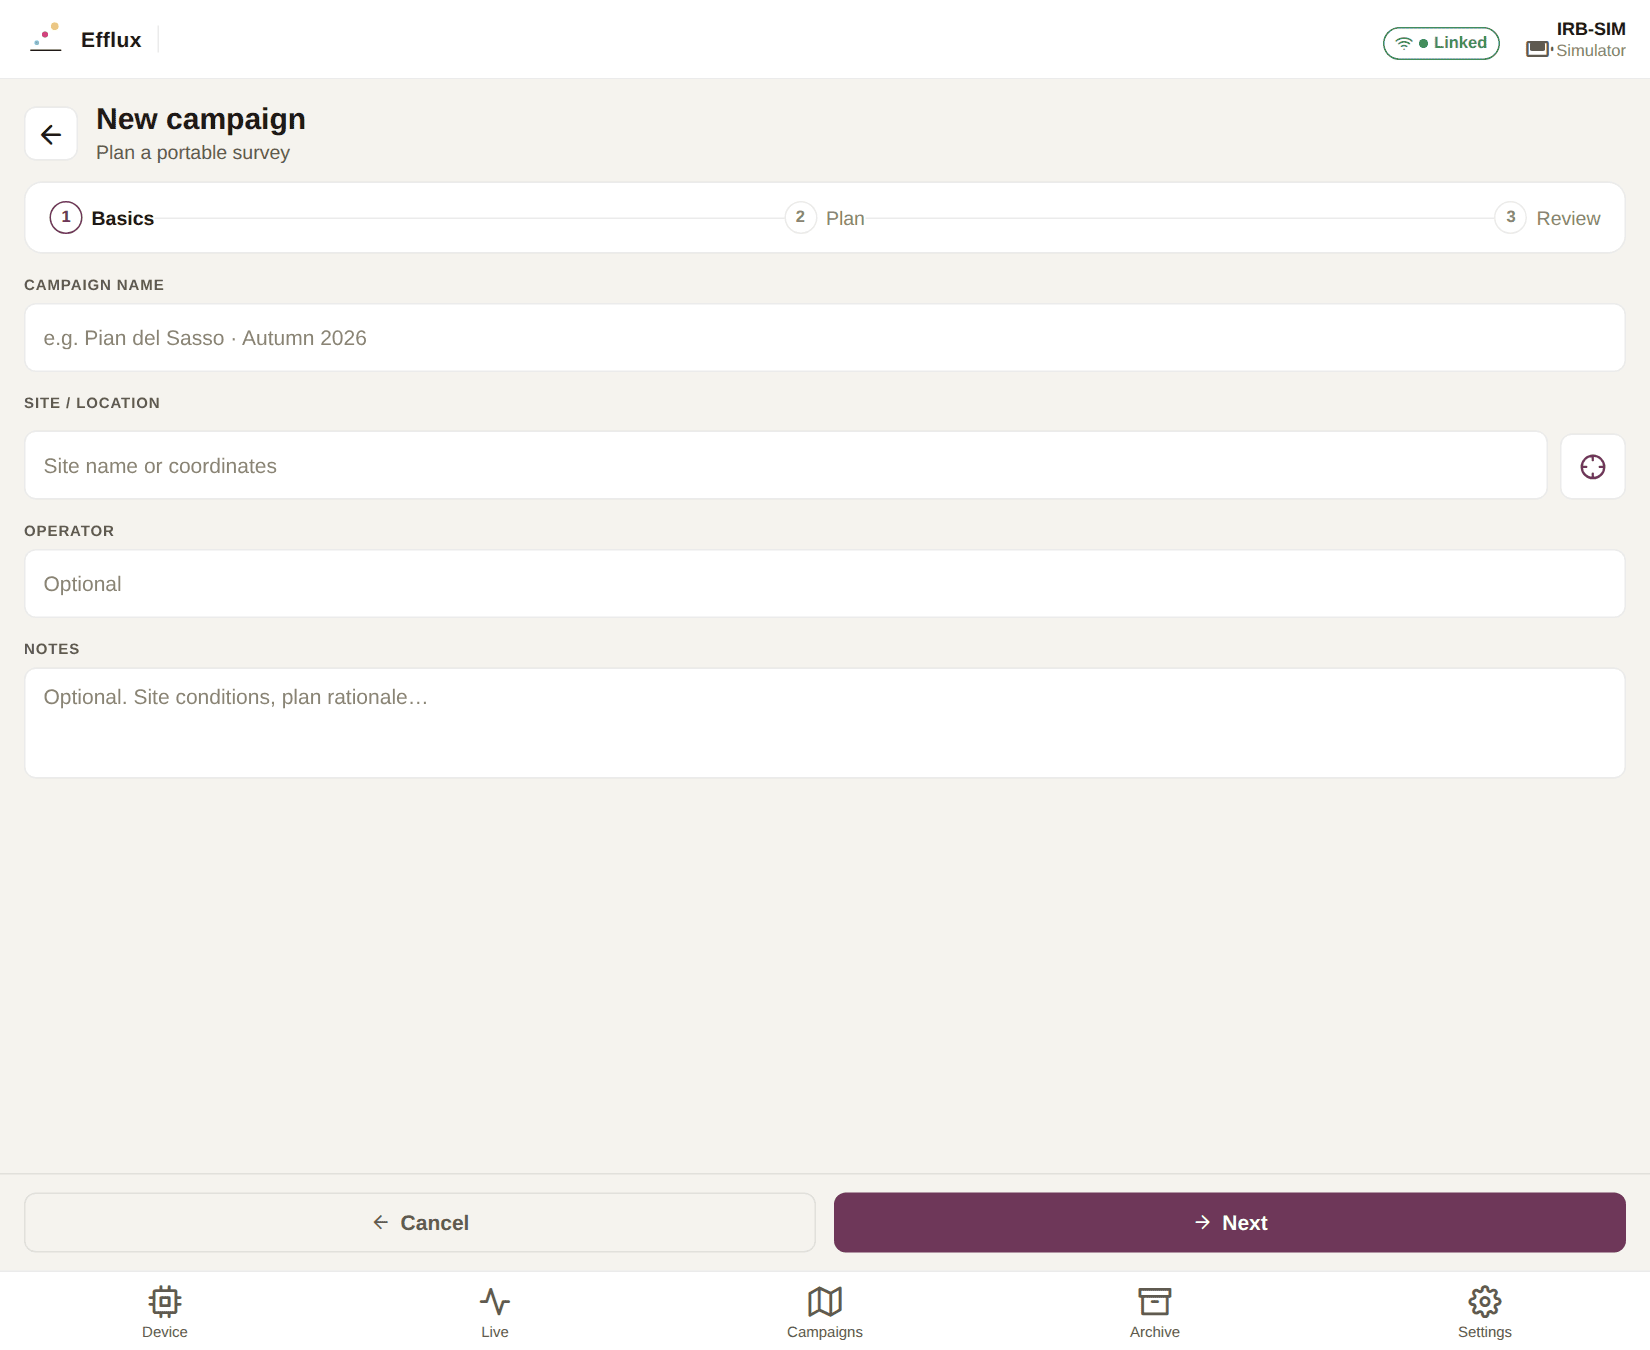
Press New campaign on the Campaigns screen. The wizard has three steps.
1 — Basics. Name the campaign, give the site (the crosshair button fills in your current position), and optionally record the operator and any notes.
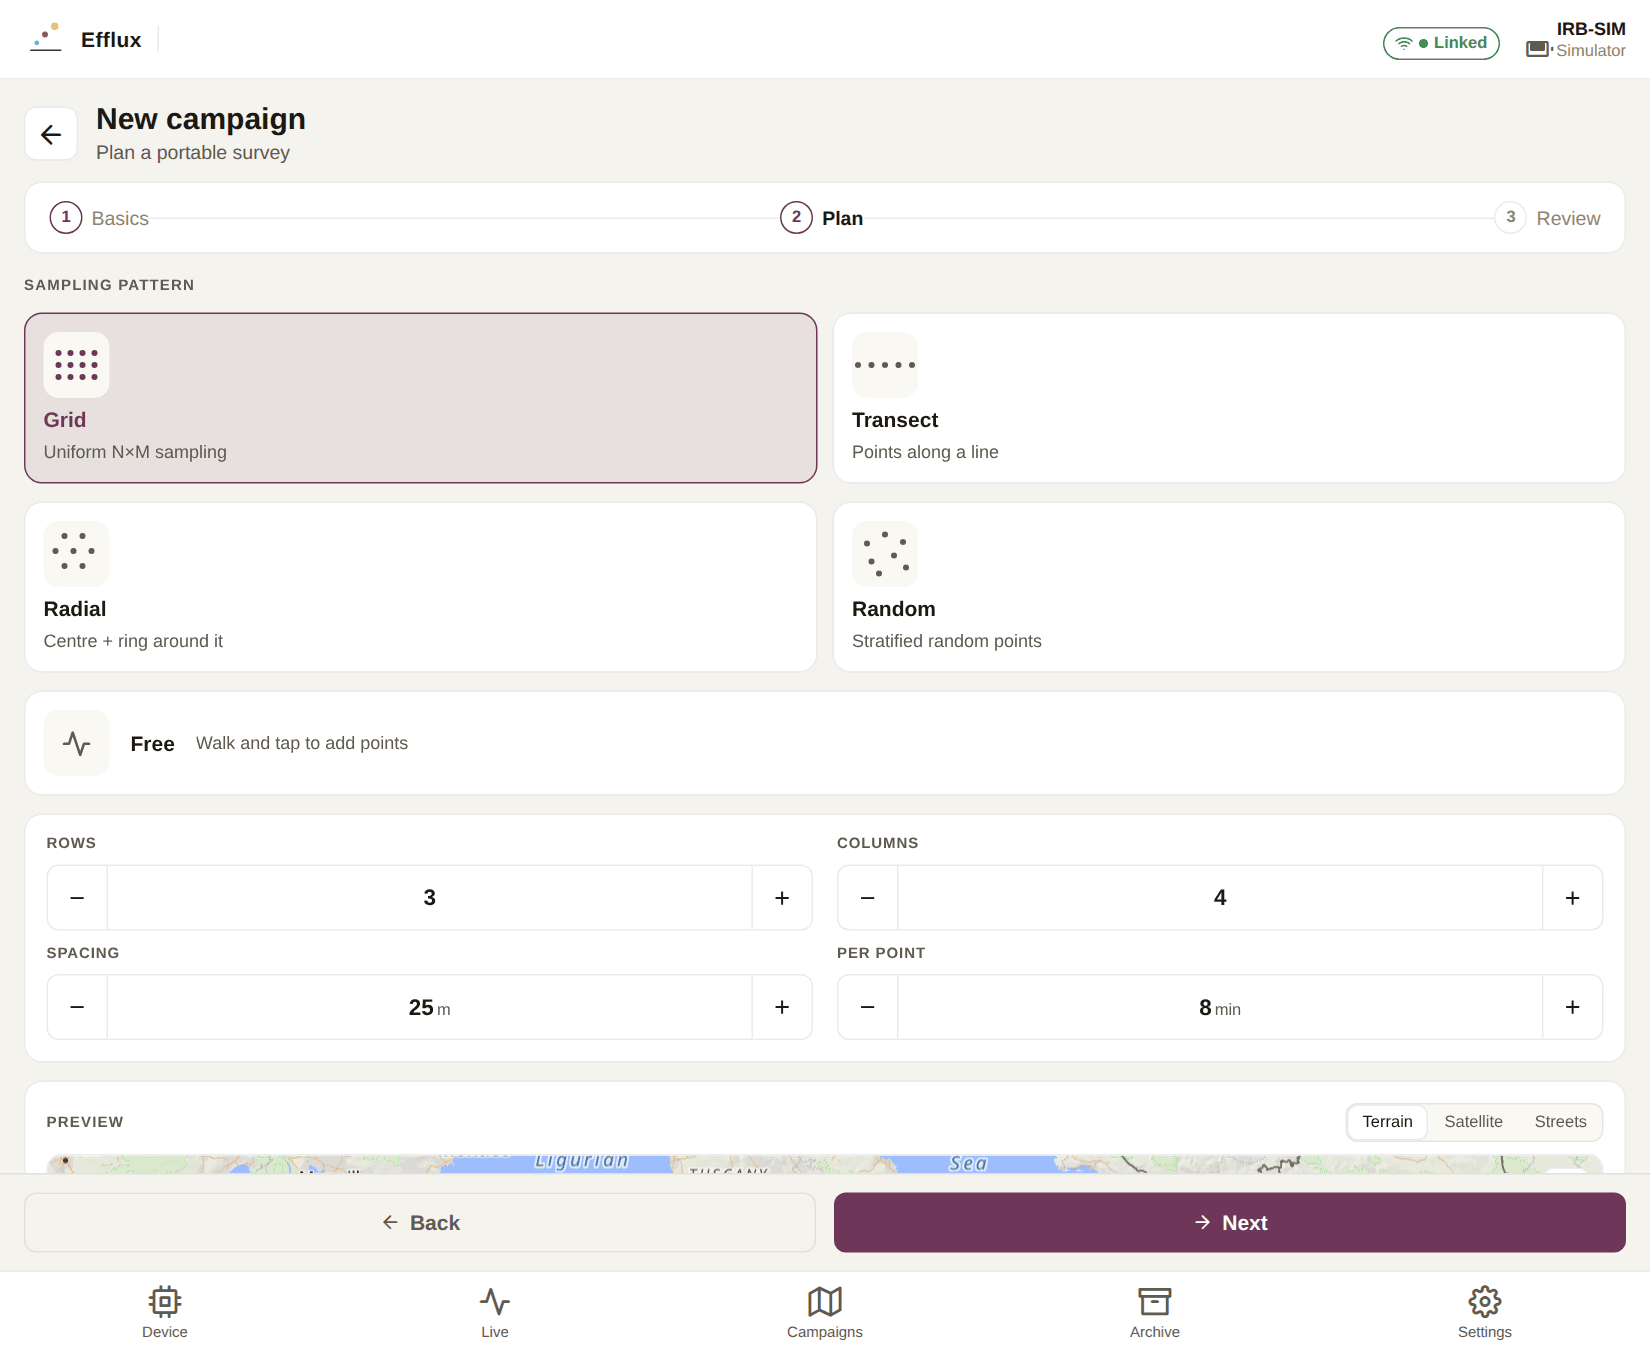
2 — Plan. Choose a sampling pattern and its parameters:
| Pattern | Points | Best for |
|---|---|---|
| Grid | A uniform N×M lattice | Statistically representative coverage. |
| Transect | Evenly spaced along a line | Capturing a gradient across a boundary. |
| Radial | A centre point plus a ring | Point-source surveys. |
| Random | Stratified random scatter | Unbiased estimates. |
| Free | None — you walk and tap to add them | Irregular plots. |
Set the rows / columns (or point count), the spacing in metres, the orientation as a compass bearing, and how long you expect to spend per point. Tap the map to place the survey area; the preview updates live and the Estimate card gives you the area covered and the expected duration. The map has Terrain, Satellite and Streets backdrops.
3 — Review. Check the summary and press Create campaign.
The campaign lifecycle #
A campaign is draft, active, paused or completed. The buttons on its detail screen move it along: Start campaign (from draft), Pause or Complete (while active), Resume (while paused) and Reopen (once completed).
Only one campaign can be active at a time. Starting a second one pauses the first. The active campaign is what Efflux uses to pre-fill the campaign and sampling point when you save an acquisition.
The flux map #
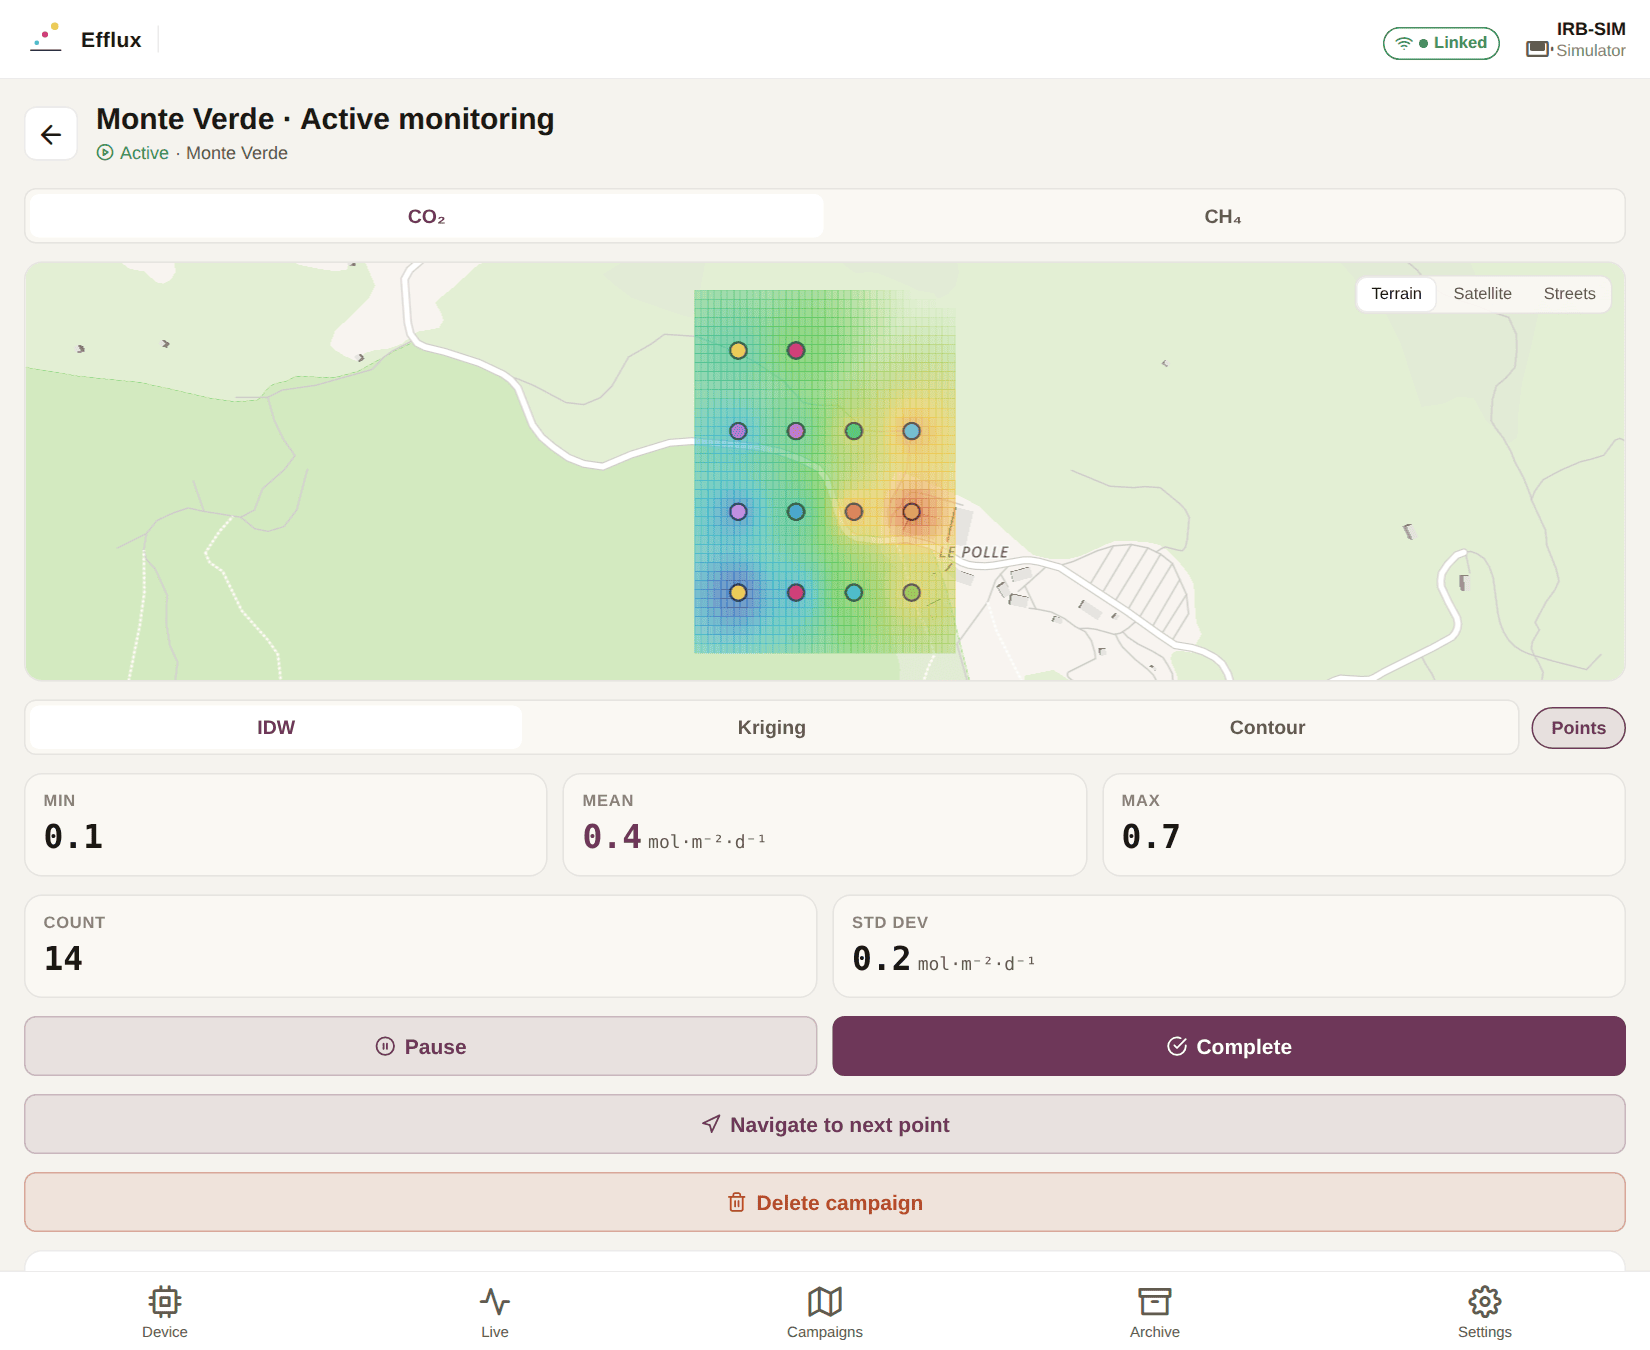
Open a campaign to see its measurements interpolated across the survey area. The tabs above the map pick the gas parameter (CO₂ / CH₄); the row below picks how the surface is drawn:
- IDW — inverse-distance weighting. A smooth field, and the safe default.
- Kriging — ordinary kriging with a spherical variogram. Usually the better-founded surface, but it needs at least three points and some spread in the values; where it cannot be solved, Efflux falls back to IDW.
- Contour — the IDW field quantised into filled bands.
- Points — toggles the individual measurement markers on and off.
Colours run blue (low) to red (high), and the surface fades out away from your samples, so an unsampled corner of the plot does not masquerade as data. Underneath are the min, mean, max, count and standard deviation for the selected gas, then the list of linked acquisitions — each with the colour of its marker, so you can match a point on the map to its record. Tap one to open it.
Walking the plan #
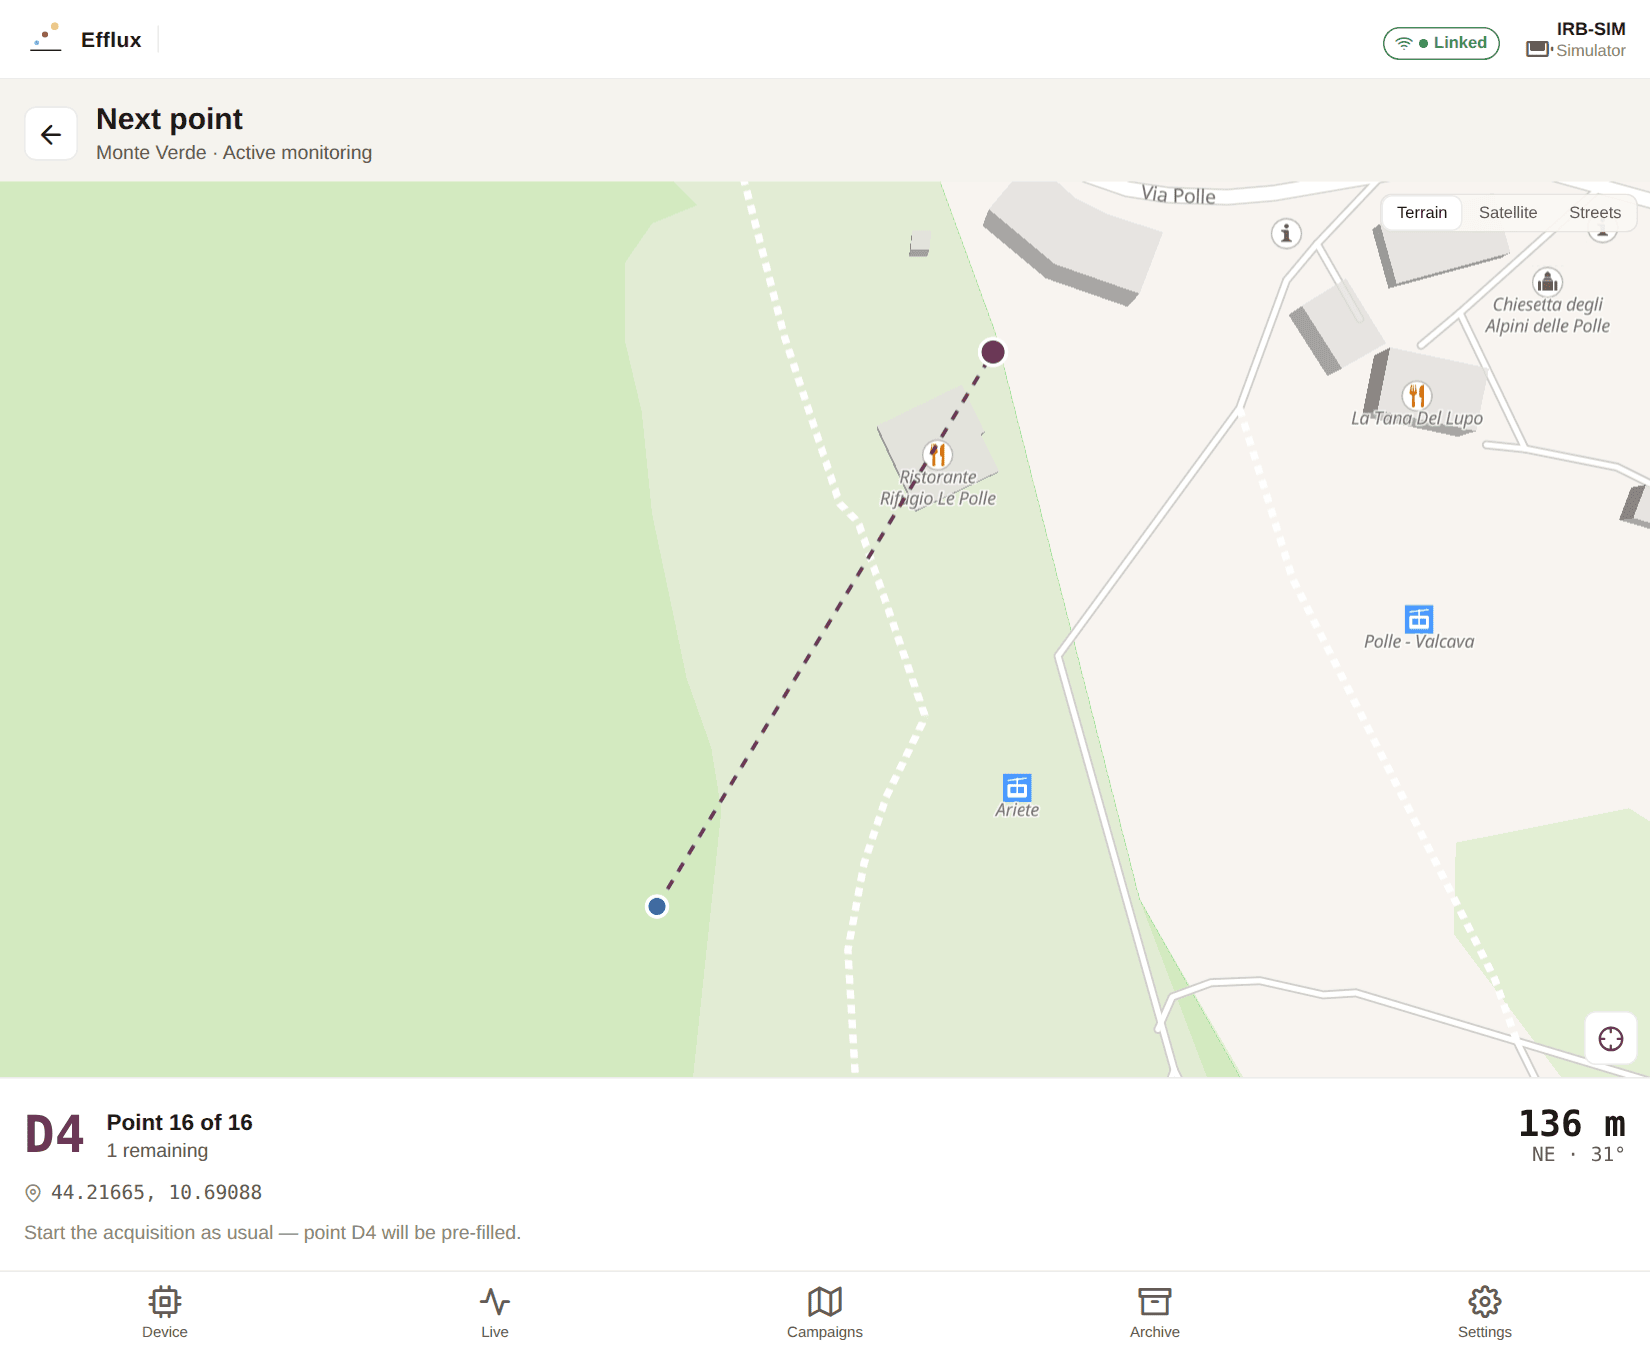
For an active campaign with a real plan, Navigate to next point guides you to the first point that has no acquisition yet. The screen shows the target, your live position, the line between them, and the distance and bearing. A banner also appears on the Device and Connect screens, so it stays visible while you walk with the instrument switched off.
When you get there, start the acquisition as usual — the sampling point is already filled in.
Assigning acquisitions later #
An acquisition’s campaign is not fixed at save time. You can change it from the Campaign selector when reviewing a single record, or select several in the Archive and use Assign.
Deleting a campaign keeps its acquisitions and simply unassigns them, unless you tick the option to delete them too.
The archive #
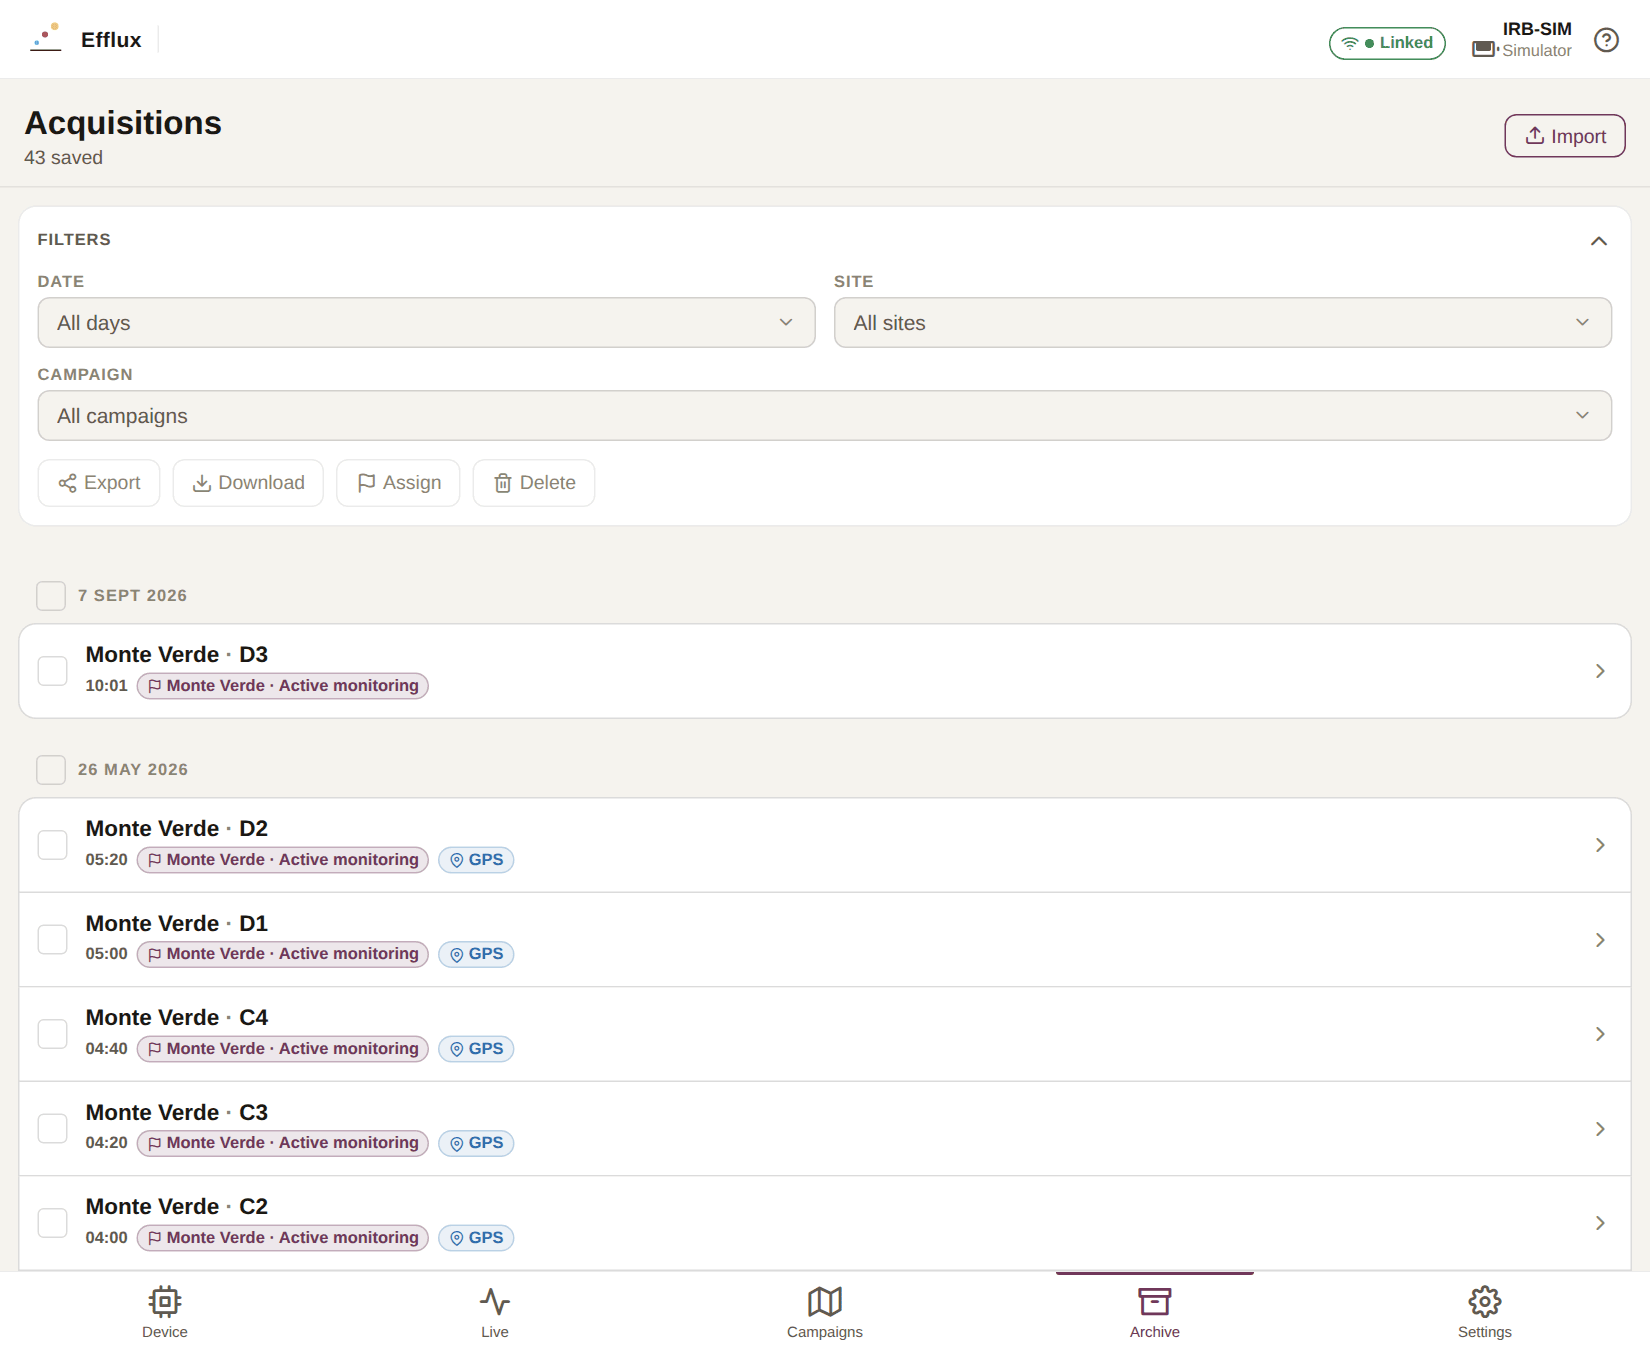
Archive lists every acquisition you have saved, newest first, grouped by day. The header counts them.
Finding a record #
The Filters card narrows the list by date, site and campaign; Clear filters resets it. Each row shows the site and sampling point, the time, a campaign chip if it is linked, and a GPS chip if it carries coordinates.
Selecting records #
Tick individual rows, or the checkbox beside a day heading to take the whole day. With a selection made, the action buttons become available: Export, Download, Assign and Delete. Deletion is permanent and asks for confirmation.
Reviewing an acquisition #
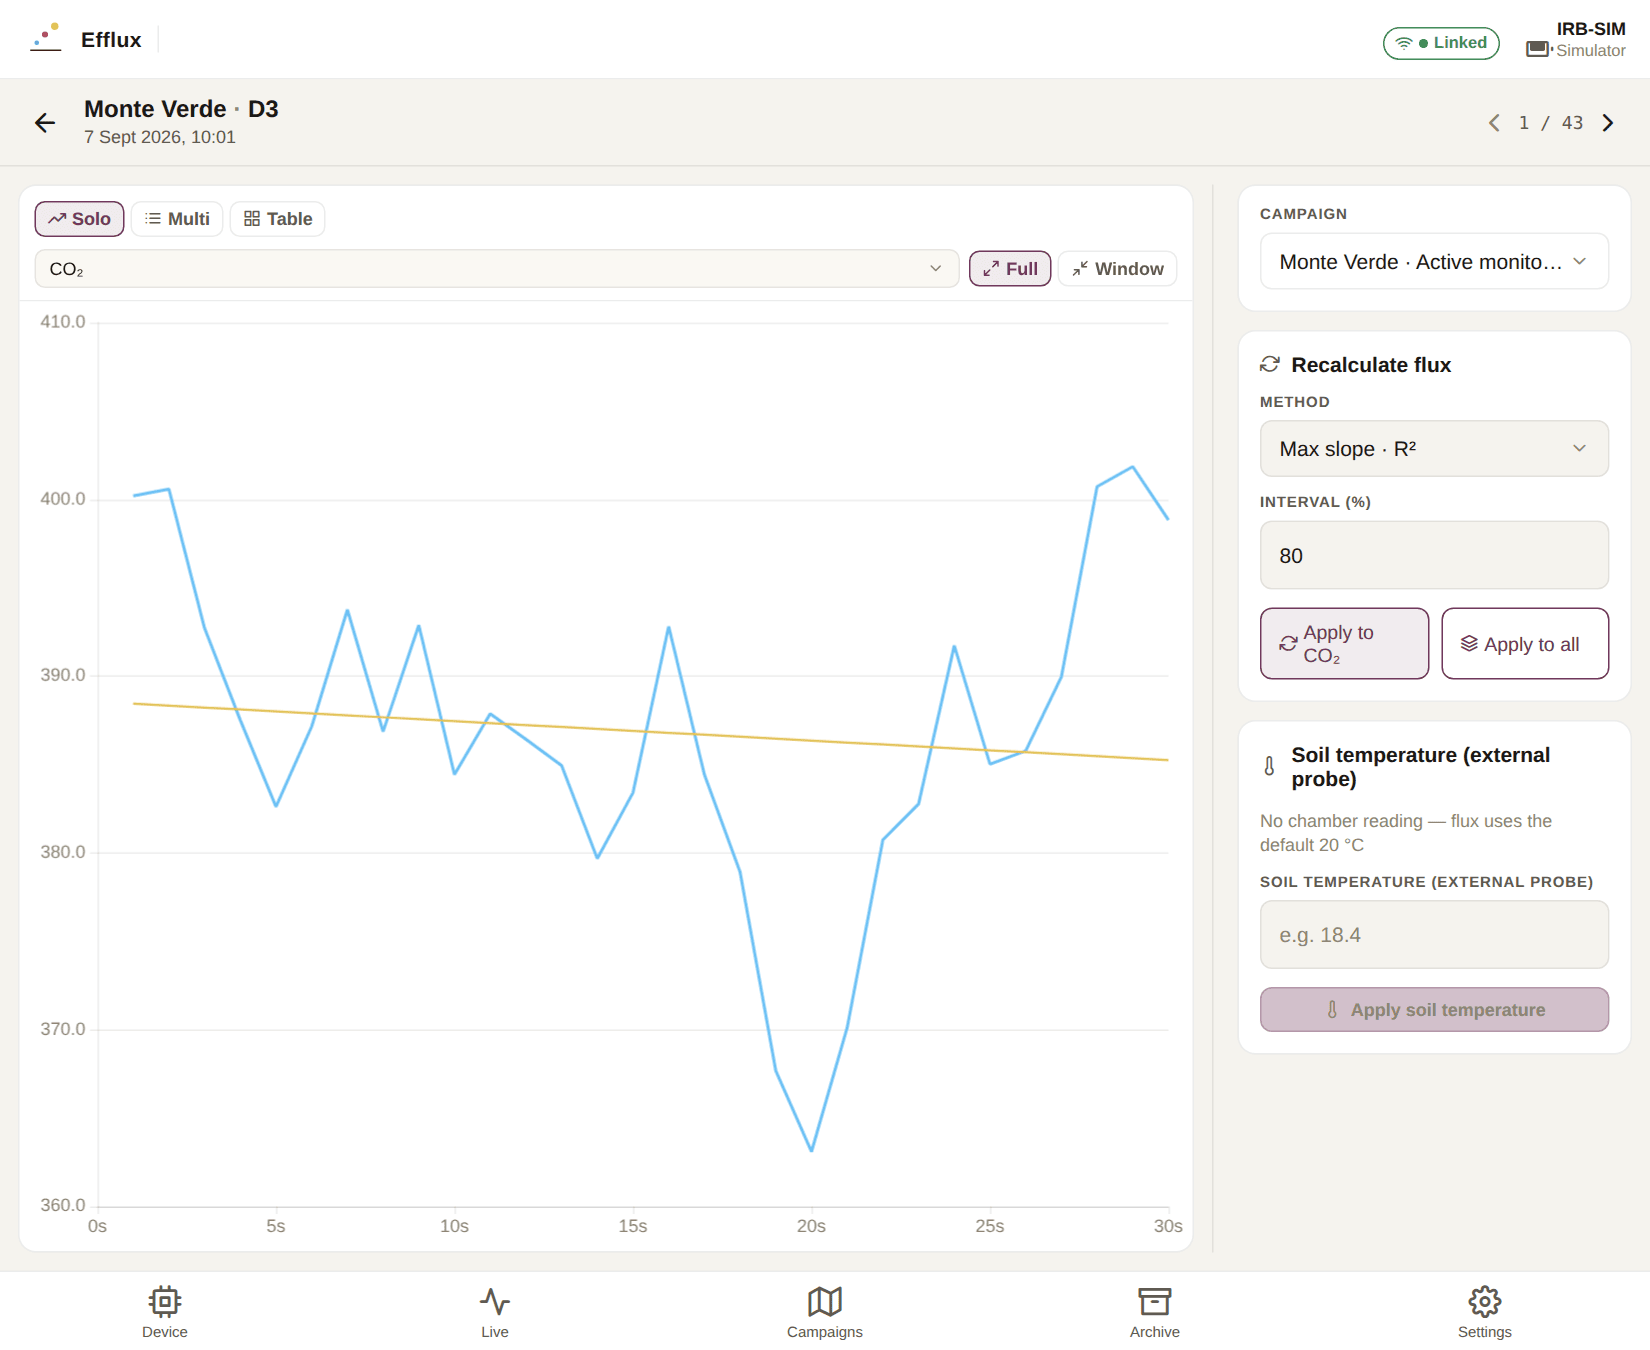
Tap a row to open it. The same Solo / Multi / Table chart controls as the Live screen are here, over the stored data, with arrows in the header to page through neighbouring records.
Recalculate flux re-fits the regression without touching the raw data. Pick a method:
| Method | What it picks |
|---|---|
| Manual | The interval you set explicitly. |
| Max slope | The window with the steepest concentration change. |
| Max R² | The window with the best-fitting straight line. |
| Max slope · R² | A compromise between the two. |
Set the interval as a percentage of the run, then Apply to the current gas or Apply to all streams, and Save.
Soil temperature works the same way as it does in the save sheet: enter a value from an external probe and press Apply soil temperature to recompute the flux with it. The panel tells you what the flux is currently using — the chamber’s mean reading, or the 20 °C default.
Getting data out #
The Archive offers two exports, side by side, for two different purposes.
Spreadsheets, for analysis #
Download produces Excel workbooks. One selected acquisition gives a single .xlsx; several give
a .zip with one workbook per acquisition plus a Summary sheet, one row per acquisition.
Each workbook contains:
- A main sheet of structured rows — raw points plus computed entries: coordinates, chamber height, and per gas the flux, R², slope, intercept and the fitting window.
- An Information sheet — site, sampling point, note, UTM zone, projection and easting/northing.
- One sheet per stream of raw data — date/time, value, milliseconds. Flux streams also carry the fit parameters on the last row.
Flux appears in the unit you chose in Settings → Units, except in the structured rows, which are
always mol·m⁻²·d⁻¹.
Backing up and moving data #
Export produces an .effluxdb file — a container holding the selected acquisitions and, if any
of them belong to a campaign, those campaigns too. This is the format to use for backups and for
moving work between devices.
Import, in the Archive header, reads one back. Campaigns are restored first so the acquisitions reattach to them, and re-importing the same file does not duplicate campaigns. Older and newer versions of the app can read each other’s backups.
Saving versus sharing #
Both dialogues let you name the file, then either save it or share it — which of the two you get depends on the platform:
- Android — Save to device writes into the public Downloads folder, and Share opens the system share sheet.
- iOS — share only, through the system sheet (Save to Files).
- Web and desktop — a normal browser download.
Device configuration #
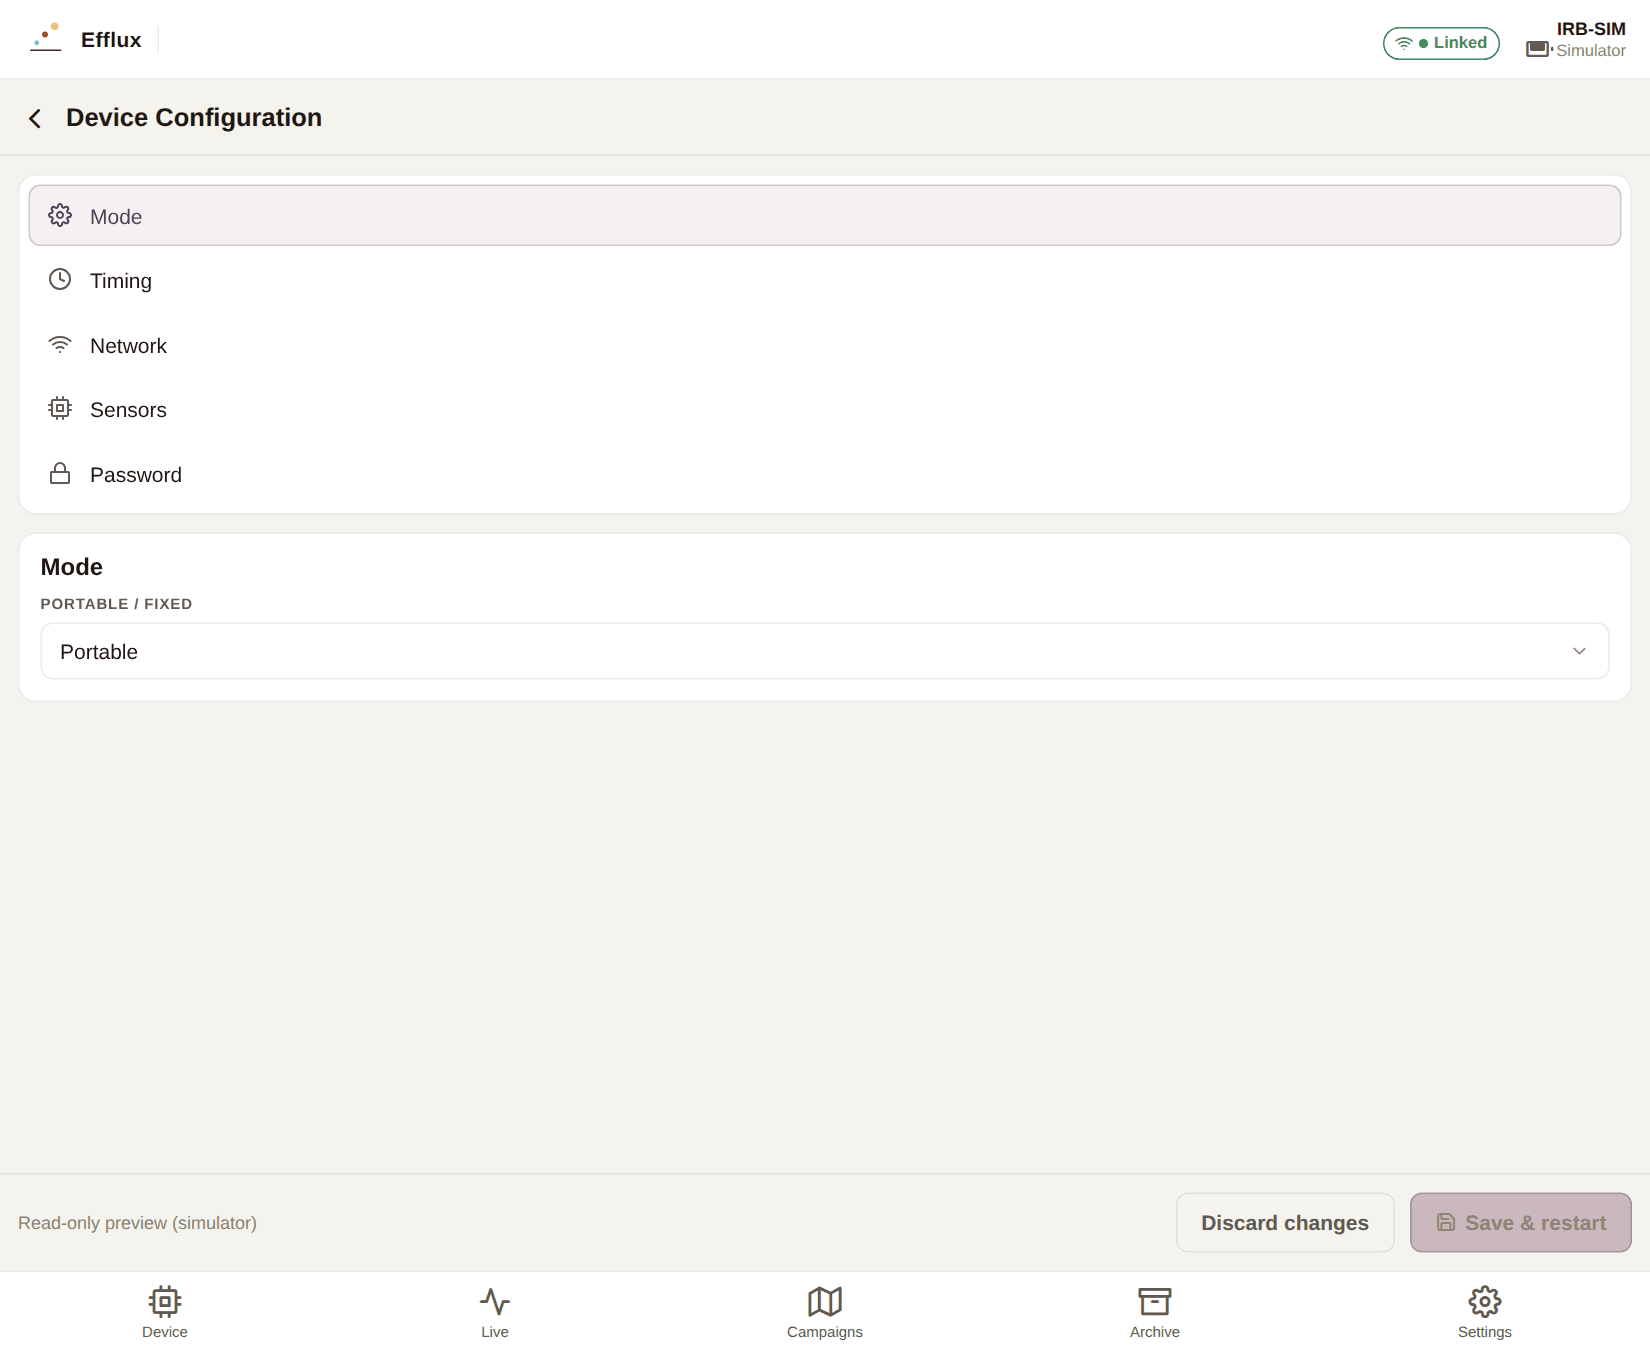
Configure on the Device screen opens the instrument’s own settings. These are written to the instrument, not to the app, so Save & restart reboots it. Discard changes leaves everything as it was.
Configuration is only available over WiFi. Connected to the simulator, the screen is a read-only preview.
| Section | Contains |
|---|---|
| Mode | Portable or fixed; the sampling point identifier; chamber volume Hc; and for fixed installations the site’s longitude, latitude and elevation. |
| Timing | Warm-up, cleaning, acquisition and interval durations; telemetry offset and window; actuator timeout; and for fixed instruments the acquisition frequency, from every 15 minutes to once a day. |
| Calc | The calculation mode (manual, max slope, max R², max slope·R²), the calculation interval, and the Kc constants per gas sensor. |
| Network | DHCP or a static IP with gateway, netmask and DNS; the telemetry backend host, port and TLS; the NTP server; and the list of dataloggers to feed. |
| Sensors | The MFC setpoint; GSS filter and zeroing; the ADC channels (enabled, voltage and value ranges); the ADC variables that map channels to named sensors; and per-gas calibration. |
| Password | Set, change or remove the configuration password. |
Gas calibration #
On instruments with firmware 0.10.0 or newer, the Sensors section carries a Gas calibration block, one row per gas sensor. The instrument applies a linear correction to each reading:
value = slope × reading + intercept
clamped, optionally, to a min and max. Leave the bounds blank for no clamping. The correction runs on the instrument, so it applies to everything it reports, not just what you see in the app.
Maintenance #
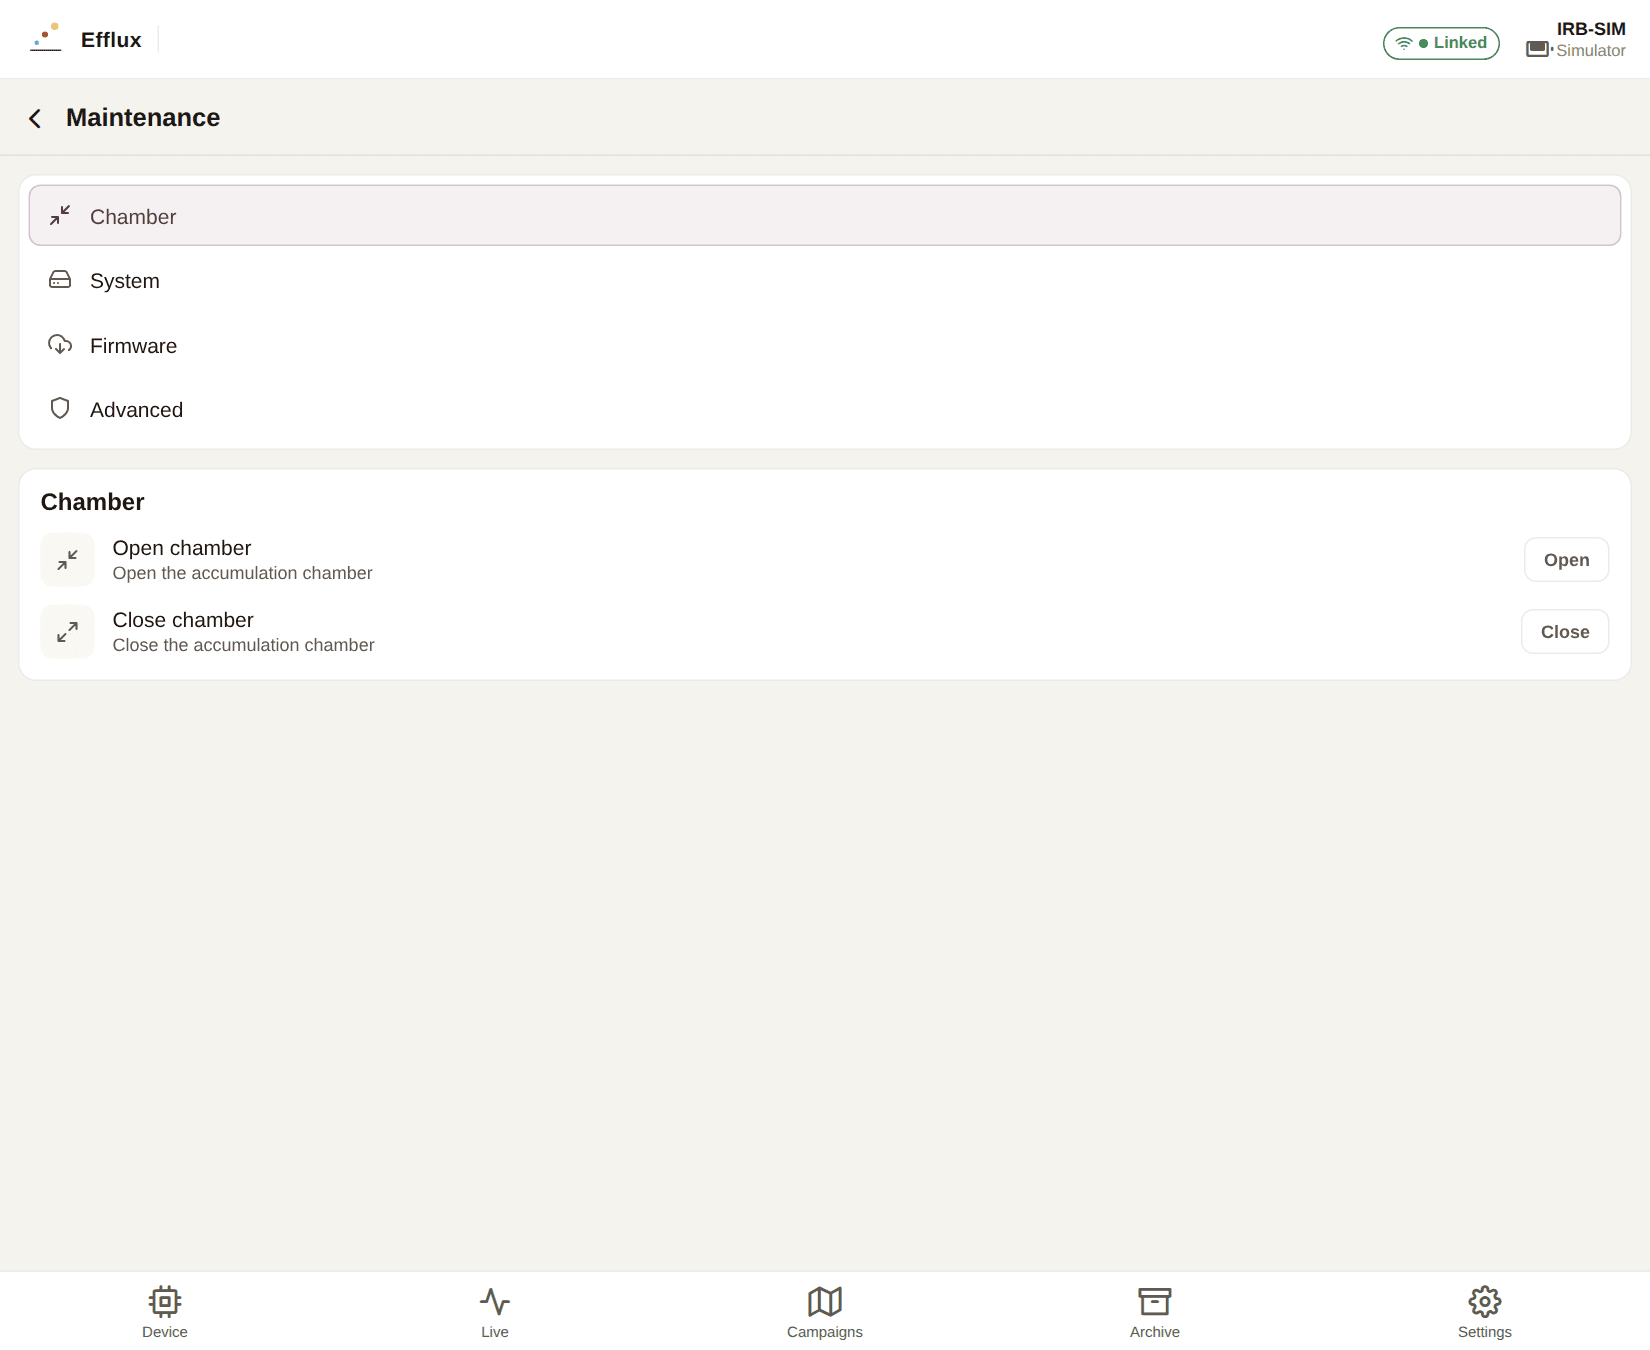
Maintenance on the Device screen groups the operations you run occasionally rather than daily.
Chamber #
Open chamber and Close chamber drive the accumulation chamber’s actuator directly — useful for checking the seal or clearing an obstruction.
System #
- Scan sensors — re-detect and re-initialise the connected sensors, after changing the sensor fit.
- Upload unsent acquisitions — push anything the instrument has not yet delivered to its backend. Fixed installations only.
- Format SD card — erases all data on the instrument’s SD card. This cannot be undone.
Firmware #
Efflux updates the IRB, the accumulation chamber and the ASB peripherals attached to the instrument — over Bluetooth or WiFi.
Press Check and Efflux compares the installed version against the update server; if there is
something newer you get Update to x.y.z. Install from file takes a .bin you already have.
Confirm, and the app uploads the image in chunks and asks the instrument to install it. Keep the instrument powered and nearby for the whole update. It reboots to flash the new firmware, which drops the connection — that is the expected ending, not a failure. Reconnect a moment later and check the version.
ASB peripherals are listed under ASB peripherals, each updated the same way; Rescan looks
again. The Configure button beside a peripheral edits its own calibration — a linear
value = A · raw + B for a PT100 probe or an H₂S/SO₂ cell, or the move timeout and switchless mode
for an accumulation-chamber actuator.
Advanced #
Locked behind the maintenance password. Once unlocked it offers Change instrument ID (a number from 1 to 999), Reset instrument (a soft restart) and Reset to bootloader (for recovering a failed firmware update). All three disconnect you.
Calibration #
On instruments that support it, this section holds the CH₄ slope and offset, the CH₄ humidity compensation, and the temperature/humidity compensation for the gas sensor — reference values, sensitivity and drift coefficients. Saving writes them to the instrument and restarts it.
Settings #
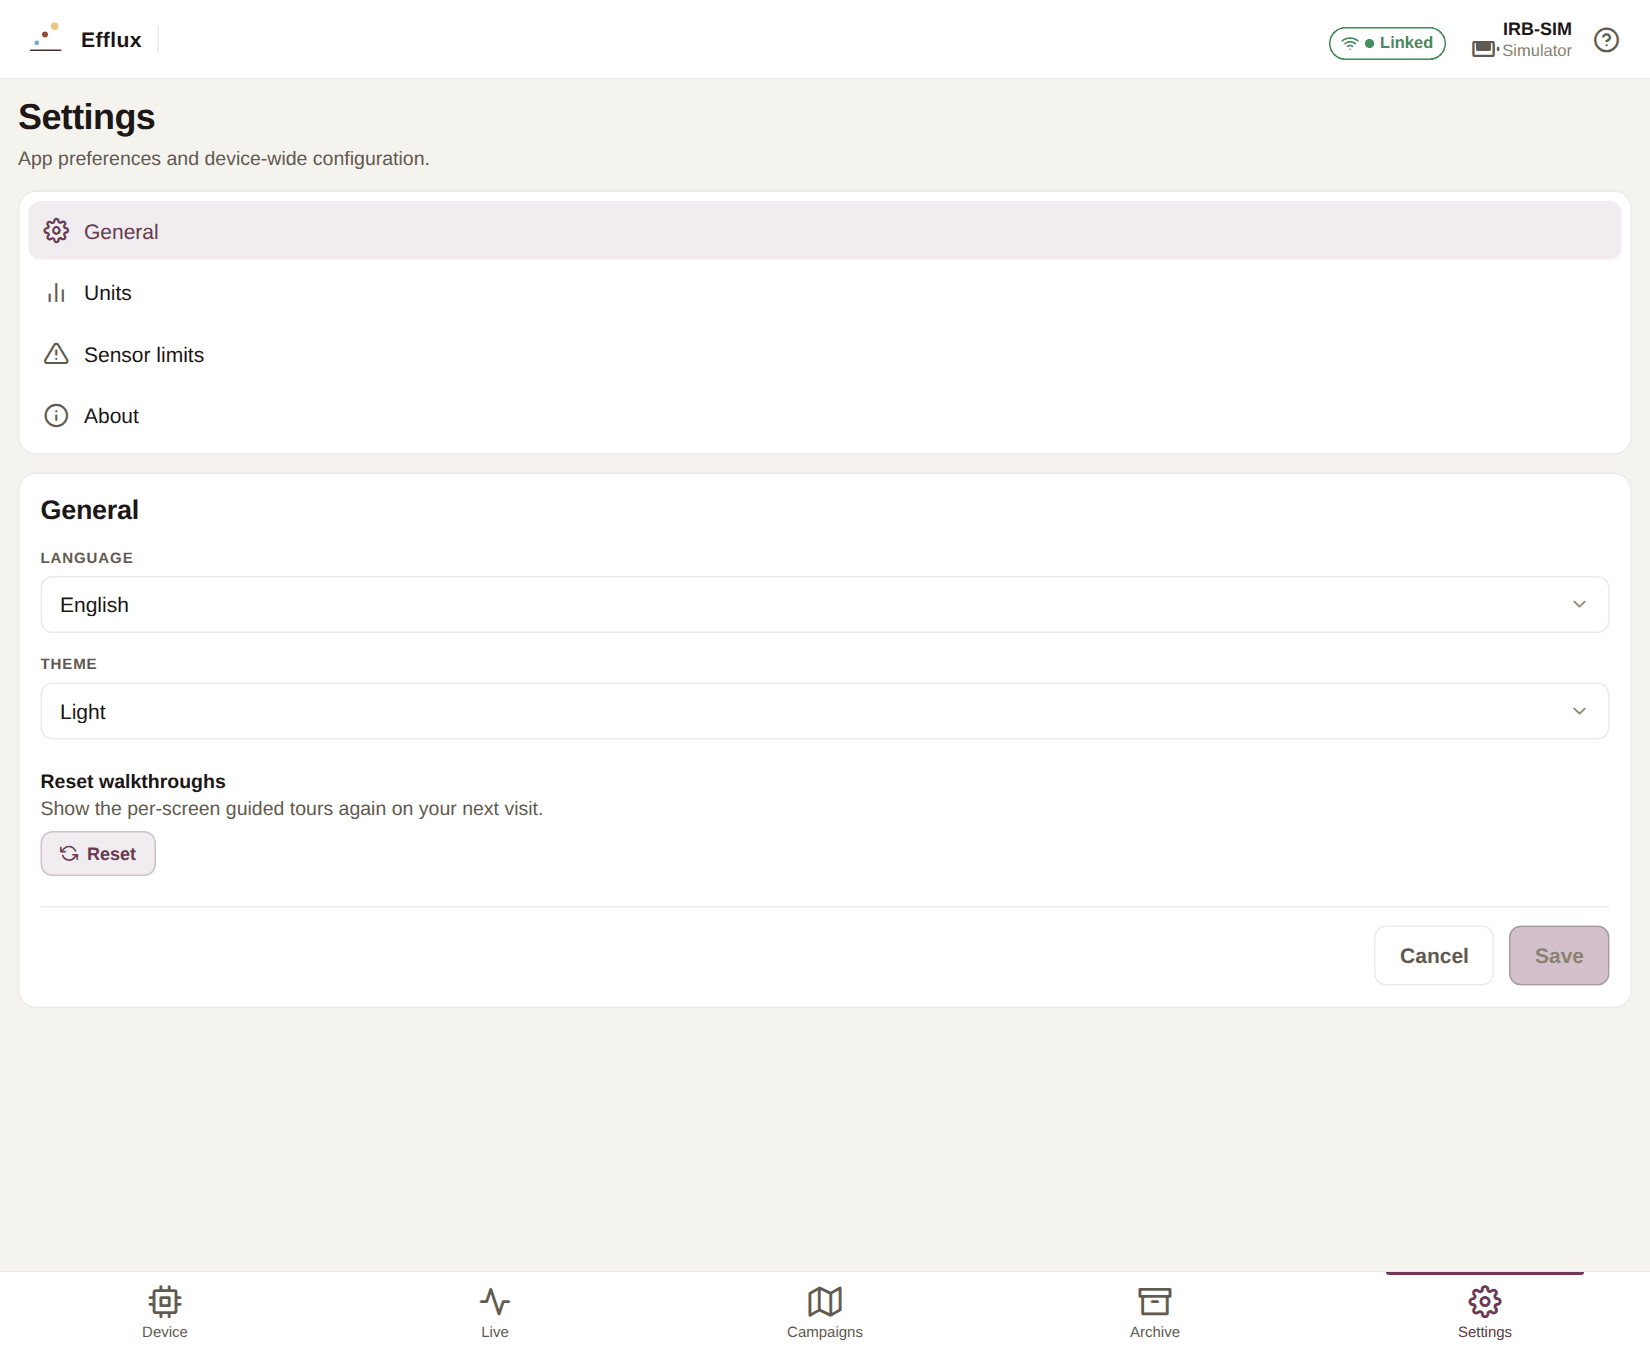
Settings are grouped into sections; changes are staged, so press Save to apply them or Cancel to discard.
General — the interface language (English or Italiano), the theme (System, Light or Dark), and Reset walkthroughs, which makes the per-screen guided tours appear again.
Units —
- Flux unit:
mol·m⁻²·d⁻¹org·m⁻²·d⁻¹. Grams are only used for gases whose molar mass Efflux knows (CO₂ and CH₄); anything else stays in moles. - Coordinate format: WGS 84 or UTM.
Sensor limits — an upper bound for the GSS, Licor and Vaisala CO₂ sensors. Readings above the limit are clamped to it, which keeps a spiking sensor from ruining a chart’s scale. Leave blank for no limit.
About — the app version and the platform you are running on.
Software updates (desktop only) — check for a new version, and install it.
Troubleshooting #
No instruments found when scanning over Bluetooth. Check the IRB is powered on and within a few metres. Confirm Efflux has Bluetooth and location permission in Android’s app settings — Android will not report BLE devices without location permission. On desktop or web there is no Bluetooth at all; use the Network tab.
“Bluetooth is unavailable in the browser”. Expected. The browser and desktop builds cannot use Bluetooth. Connect the instrument to WiFi and use the Network tab, or use the Android app.
The Network tab says the Efflux helper is needed. You are on the HTTPS web app, which browsers do not allow to open an unencrypted connection to a device on your network. Install the helper from efflux.witrec.it/helper; Efflux routes through it automatically once it is running.
Nothing is discovered on the network.
mDNS auto-discovery is Android-only. On desktop and web, type the instrument’s IP address or
.local hostname into Connect by IP / hostname. Also check that the computer and the instrument
are on the same network segment.
Sensor values show --.
The sensors are still paused. Press Power on sensors on the Device screen and wait through the
warm-up. A sensor showing Error or Off stays that way regardless.
The flux looks wrong, or R² is low. A low R² means the concentration did not rise or fall cleanly. Check that the chamber sealed properly, that the run was long enough, and that Chamber Hc matches the chamber actually fitted. You can correct all of this after the fact: open the record in the Archive and use Recalculate flux — try Max R² to find the best-fitting window.
“Low flow” during an acquisition. The measured flow is well below the MFC setpoint. Check the pneumatic circuit for a blockage or a leak, and confirm the setpoint is right for the chamber in use.
Configuration is only available over WiFi. Device configuration cannot be edited over Bluetooth. Connect the instrument to the network and try again.
A firmware update did not finish. The instrument is unchanged — nothing was flashed. Reconnect and try again, keeping the instrument powered and close by for the duration. If it will not start at all, Maintenance → Advanced → Reset to bootloader puts it into a state where the update can be retried.
An acquisition has no GPS chip in the Archive. No position was available when it was saved — location permission denied, or no fix yet. Grant Efflux location permission, and give the receiver time to lock on before starting. You can add positions after the fact with an eTrex track: see Garmin eTrex SE.
The GLO 2 says “Waiting for a satellite fix”. The receiver is connected but has not locked on yet. A cold start outdoors usually takes under a minute; indoors or under heavy canopy it may never succeed. Until it does, Efflux keeps using the device’s own position, so you are not blocked from measuring.
Applying an eTrex track updated fewer acquisitions than expected. The others fell outside the period the track covers — the count is reported as N outside track. Check that the eTrex was actually recording during those measurements, and that both clocks are right; matching is done by timestamp.
Everything about GPS is missing on the desktop or web build. The GLO 2 card is hidden where Bluetooth is unavailable, and the eTrex card keeps only Import track (GPX/FIT). Download the track on a phone, or export it from the receiver and import the file. See What works on which platform.
A campaign shows no flux map. The surface is drawn from acquisitions linked to that campaign. Record some, or assign existing ones with Assign in the Archive. Kriging in particular needs at least three points with some spread between them; Efflux falls back to IDW when it cannot solve.
My acquisitions disappeared on the web app.
Browser data was cleared. Efflux stores everything locally, so there is no copy to restore from —
export an .effluxdb regularly if you rely on the web build, or use the Android or desktop app.
Questions, or a problem this manual does not cover? Get in touch through efflux.witrec.it.